Setting up Products
Petroleum Industry Data Exchange (PIDX) codes are the industry standard codes that identify products sold at the rack. The PIDX Downstream committee maintains these codes. Available product codes entered in DTN TABS should map back to an internal product code in the ERP or billing system. Once created, products are available to be assigned to Product Groups, Terminals and Product Allocations within the DTN TABS database.
Note: If you have chosen to use our optional Material Code Mapping Feature, please refer to the DTN TABS Material Code Mapping Supplement for more information on this page.
-
- From the DATA MANAGEMENT menu, select The Product Details page opens.
Searching for a Product
The Search Products panel allows you to search by Proprietary name, PIDX Code or PIDX Master Search using a keyword or searching for all available options by leaving the Key Word field blank.
Here’s how to search for a product by Proprietary Name or PIDX Code:
- Enter a proprietary name or PIDX Code in the Key Word
- From the Search By arrow, select the desired option.
- Click
 The Your Available Products list contains the search results.
 - Select a product from the Your Available Products The following panels display based on the product selection:
- Product Details
- PIDX Product Description
- Product Associations
- Assign To Product Group
The Product Details panel automatically populates based on the search criteria. This information begins the process of adding new products to the database.
- Proprietary Name
- Identifies a product by the name that is commonly used for that product. This name is included on reports.
- PIDX Code
- Displays the Petroleum Industry Data Exchange (PIDX) Code. This code is a unique, 3-character, alphanumeric identifier for the product.
- This is a required field.
- Product Family
- Specifies the product families setup through PIDX. The 1st letter of the PIDX code identifies the family.
- This field automatically populates with the first character in the PIDX code.
The PIDX Product Description panel provides additional product detail. Information auto fills if PIDX Code exists in PIDX Master Search.

The Product Associations panel provides a list of all terminals the product is assigned.

The Assign to Product Groups panel provides a list of all product groups in your DTN TABS database and product groups that contain the product. You can also assign the product to a product group from here.

Here’s how to search for a product by PIDX Master Search:
- From the Search By arrow, select PIDX Master Search. The PIDX Master Search Options pane opens.

- Enter the criteria for the product you wish to search.
- Click
- Select the appropriate PIDX codes to add a product through this Master Search and click
 to add them to your database.
Setting up Product Groups
Product Groups are used to combine products in a logical manner based on your business needs. Product groups combine products in any way you require.
For example, to control all your gas products regardless of grade, you can create a product group, Gas, that contains all the individual product codes used for your gasoline products. This new group allows you to build product allocations on all of your gas products at one time. Product Groups can be created for individual grades as well, so groups could be created that only contain Premium, Regular, and Midgrade products. This allows you to create allocations for those individual grades.
Note: For terminals using the Version 1 protocol (CA/BB/CB), allocations can only return the family (first letter of the PIDX code) in the authorization string. When creating groups, make sure there are no conflicts (i.e. products in family C in two groups for allocation) at a given terminal.
-
- From the DATA MANAGEMENT menu, select Product Groups. The Product Groups page opens.
The Search Product Groups panel searches by group name or product family using a keyword or searching for all available options by leaving the Key Word field blank. The Product Groups arrow browses all product groups in your database.
Working with a Product Group
Here’s how to search for and add a product group:
- Enter a group name or product family in the Key Word field and click or select an existing Product Group from the Product Groups dropdown
- The Product Groups panel displays the information for the group requested and is also, where you begin the process of adding new or editing current products groups to your database. Complete the following fields to add or edit product groups:
- New Product Group Name
- Displays the name assigned to the group. For example, Gas (all gasoline) or ULSD (Ultra Low Sulfur Diesel).
- Available Products
- Lists the products available to assign to the group.
- Products in Group
- Identifies the products chosen for the group.
- To edit an existing Product Group, Select the group in the Search Product Groups
- Add or remove products in the Product Groups panel products using
 ,
,  , or
, or  between the Available Products and Products in group columns and click .
- Add or remove products in the Product Groups panel products using
- To create a new Product Group, click
 in Search Product Groups
- Enter a new product group name, add products using , , or between the Available Products and Products in group columns and click .
- Enter a new product group name, add products using
Setting up Terminals
The Terminals page identifies the proprietary and 3rd terminals where the marketer or seller supplies product.
Terminals are identified by a Terminal ID, which is made up of the Standard Point Location Code (SPLC) and the Terminal Owner Code.
- SPLC – a unique identifier for the geographic location where a terminal is physically located. This number is maintained and distributed by the National Motor Freight Traffic Association.
- Terminal Owner Code – the DTN defined TABS Seller ID of the operator or owner of the terminal facility and the “sender” of customer authorizations and bills of lading (BOLs) to DTN TABS.
- From the DATA MANAGEMENT menu, select Terminals. The Search Terminals page opens.

- Select the desired terminal to display the setup information:
- Owner Lookup
- Displays a list of all authorized senders of DTN TABS transactions, assigned by DTN.
- Selecting from this list while in the Manual Add page and pushing populates the Owner field with the selection.
- SPLC
- Contains the Standard Point Location Code (SPLC). This is a required field.
- Owner
- A unique 3-digit identifier for the terminal owner or operator. This is an authorized sender of TABS transactions, assigned by DTN. It is included as the last 3 digits of the DTN TABS Terminal ID. This is a required field.
- TCN
- Displays the Terminal Control Number (TCN). This is a unique number assigned by the IRS. The Sync Data icon next to this field automatically populates the terminal’s address.
- Note: 4.01 protocol requires this information. DTN TABS recommends entering this information for all terminals
- Proprietary Name
- The name used to identify the terminal. Use the name your ERP/billing system uses or use the DTN TABS Best Practice Naming Convention formula: City State – Terminal Owner – Plant Number (or other internal code)
- For Example: DALLAS TX – Shell – B345
- Process BOL
- Indicates how BOLs process for download for this terminal. Options are:
- Applied at Terminal Consignee Level: Indicates that BOL processing is defined on a consignee-by-consignee basis. If selected, go to the Consignee Setup page and turn BOL processing on or off for each consignee.
- ProcessBOL: Indicates that all BOLs from this terminal will be downloaded and sent to your ERP or billing system.
- Do Not ProcessBOL: Indicates that BOLs won’t be downloaded and sent to your ERP or billing system. These BOLs still appear in reports and in the BOL viewer.
- Indicates how BOLs process for download for this terminal. Options are:
- Terminal Timezone
- Sets the time zone that the Terminal. BOLs display.
- This time zone appears on all reports and is downloaded in this time zone if the marketer or seller has Receive BOL in Terminal Time Zone option selected on the Defaults page.
- Daylight Savings/Summer Time
- Applies Daylight Savings Time (DST) automatically in DTN TABS, if selected.
- Plant ID
- Specifies the unique ID configured within your ERP or billing system that can be added into DTN TABS.
- Supply Point
- Contains the supply point group code for reporting.
- Pricing Region
- Provides the Spot Market that the terminal is in for Enhanced Credit calculations.
- Is Master Data Active
- If Master Data is being used, indicates that Master Data can make updates to this location, if selected.
- Accepts Material Code
- Specifies that the terminal can send proprietary product material codes matching the seller’s products such as an equity terminal sending the seller codes.
- Total Allocations
- Displays the total number of current allocations at this terminal.
There are two ways to search for terminals:
- Search for existing terminals setup within the database using the Search Terminals panel and selecting one of the options:
- Proprietary Name
- SPLC
- City/Town
- State/Locality
- DTN Terminal Master
- Supply Point
- Search for terminals not setup within the database using the DTN Terminal Master by either entering a keyword in the Key Word field or searching for all available options by leaving the Key Word field blank.
Working with Terminals
Here’s how to search for and add a terminal:
- From the Search Terminals page, click The Search Terminal Master page opens.
- Select an option from the Search By
- Enter a keyword in the Key Word
- Click The Search Terminals Master panel displays the information for the terminal requested.
- Select the desired terminal to add to your DTN TABS database and click

- If the terminal is not shown, click
 and complete the following fields:

- Owner Lookup
- Displays a list of all authorized senders of DTN TABS transactions, assigned by DTN.
- Selecting from this list while in the Manual Add page and pushing populates the Owner field with the selection.
- SPLC
- Contains the Standard Point Location Code (SPLC). This is a required field.
- Owner
- A unique 3-digit identifier for the terminal owner or operator. This is an authorized sender of TABS transactions, assigned by DTN. It is included as the last 3 digits of the DTN TABS Terminal ID. This is a required field.
- TCN
- Displays the Terminal Control Number (TCN). This is a unique number assigned by the IRS. The Sync Data icon next to this field automatically populates the terminal’s address.
- Note: 4.01 protocol requires this information. DTN TABS recommends entering this information for all terminals
- Proprietary Name
- The name used to identify the terminal. Use the name your ERP/billing system uses or use the DTN TABS Best Practice Naming Convention formula: City State – Terminal Owner – Plant Number (or other internal code)
- For Example: DALLAS TX – Shell – B345
- Process BOL
- Indicates how BOLs process for download for this terminal. Options are:
- Applied at Terminal Consignee Level: Indicates that BOL processing is defined on a consignee-by-consignee basis. If selected, go to the Consignee Setup page and turn BOL processing on or off for each consignee.
- ProcessBOL: Indicates that all BOLs from this terminal will be downloaded and sent to your ERP or billing system.
- Do Not ProcessBOL: Indicates that BOLs won’t be downloaded and sent to your ERP or billing system. These BOLs still appear in reports and in the BOL viewer.
- Indicates how BOLs process for download for this terminal. Options are:
- Terminal Timezone
- Sets the time zone that the Terminal. BOLs display.
- This time zone appears on all reports and is downloaded in this time zone if the marketer or seller has Receive BOL in Terminal Time Zone option selected on the Defaults page.
- Daylight Savings/Summer Time
- Applies Daylight Savings Time (DST) automatically in DTN TABS, if selected.
- Plant ID
- Specifies the unique ID configured within your ERP or billing system that can be added into DTN TABS.
- Supply Point
- Contains the supply point group code for reporting.
- Pricing Region
- Provides the Spot Market that the terminal is in for Enhanced Credit calculations.
- Is Master Data Active
- If Master Data is being used, indicates that Master Data can make updates to this location, if selected.
- Accepts Material Code
- Specifies that the terminal can send proprietary product material codes matching the seller’s products such as an equity terminal sending the seller codes.
- Total Allocations
- Displays the total number of current allocations at this terminal.
7. Click ![]() to add the terminal that was manually entered.
to add the terminal that was manually entered.
The Assign Products panel provides a list of all available products in your DTN TABS database and a list of all products assigned to this terminal. This is also where you assign products to the terminal.
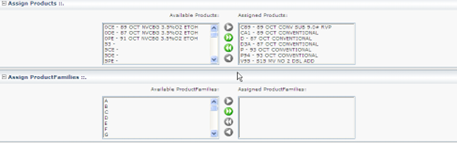
Products can be assigned by moving them from the Available Products on the left side of the Assign Products panel to the right – Assigned Products. These include the products that have been previously set up in the Products menu.
The Assign Product Families panel provides a list of all product families available in your DTN TABS database and a list of all product families assigned to this terminal. This is also where product families can be assigned to the terminal.
Note: If you have chosen to use our optional Material Code Mapping Feature, please refer to the DTN TABS Material Code Mapping Supplement for more information on this page.
Product Families can be assigned by moving them from the Available Product Families on the left side of the Assign Product Families panel to the right –Assigned Product Families. These include the products that have been previously set up.
The Assigned Consignees panel shows a list of all consignees assigned to this terminal.

Consignees are assigned to the terminal through the Seller Consignee page, a Master Data process or ADMLOD submission. Consignees not assigned to the terminal are denied at the rack.
The Assign to Terminal Groups panel provides a list of all terminal groups in your DTN TABS database and a list of all terminal groups currently attached to the terminal. This is also where the terminal can be assigned to a terminal group.

Terminal groups can be assigned by moving from the Available Groups column on the left side of the Assign To Terminal Groups panel to the Assigned Groups column on the right side.
Setting up Terminal Groups
Terminal groups combine multiple terminal locations in to a single entity and are most commonly used for reporting purposes. Terminal groups can also be used for allocation controls and other business needs. The terminal group name should identify the intended purpose of the group. For example:
- Gulf Coast Regional Allocation
- Gulf Coast Regional Reporting
- Explorer Pipeline Reporting
- Selma NC Terminals Allocation
- NuStar Supply Partner Reporting
One reason to use a terminal group for allocations is a city where there are multiple facilities owned by the same company. For example, New Haven Connecticut has three unique Magellan facilities, and you want to control liftings at all locations as one unit.
Terminal groups allow for quick scaling of all allocations on a geographic region such as Gulf Coast Region in the case of hurricane season.
- From the DATA MANAGEMENT menu, select Terminal Groups. The Search Terminal Groups page opens.
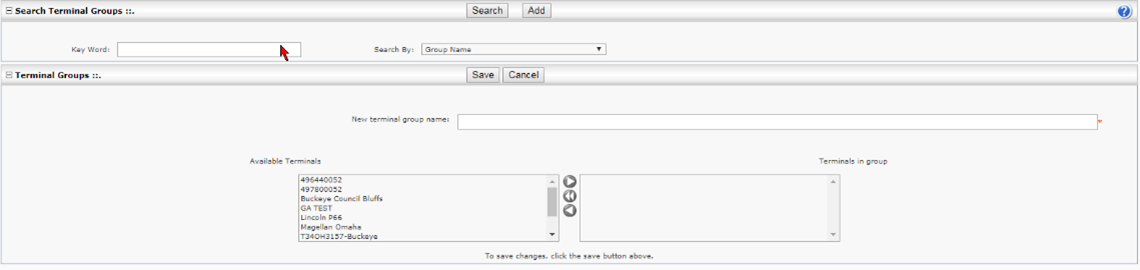
The Search Terminal Groups panel allows you to search by Group Name either using a Key Word or searching for all available options by leaving the Key Word field blank.
Working with Terminal Groups
Here’s how to search for and add a terminal group:
- Enter a group name in the Key Word
- Click The Terminal Groups panel provides the information for the group requested.
- To add a terminal group, enter the following information:
- New Terminal Group Name
- Specifies the proprietary name of the terminal group. The proprietary name should be a description of the purpose of the group. For example:
- Gulf Coast Regional Allocation
- Gulf Coast Regional Reporting
- Explorer Pipeline Reporting
- Selma NC Terminals Allocation
- NuStar Supply Partner Reporting
- Specifies the proprietary name of the terminal group. The proprietary name should be a description of the purpose of the group. For example:
- Available Terminals
- Lists the terminals setup in your DTN TABS database. You can add terminals to the group by selecting and using the arrows to move to terminals in the group box.
- Terminals in Group
- Displays the terminals that belong to the selected terminal group.
4. Click ![]() .
.
Setting up Channels
Channel setup adds customer channels to your pre-populated list allowing for greater data integrity.
Customer channels are important for clients who are using the optional DTN TABS add-ons of the Allocation Viewer, Forecast module and Master Data module or the DTN Fuel Seller service. Channels identify a specific class of trade such as:
- BRANDED
- AVIATION
- I&W
- COMMERCIAL
- RACK
- EXCHANGE
- CONTRACT
- UNBRANDED
- UNBRANDED CONTRACT
Searching for Channels
- From the DATA MANAGEMENT menu, select Channels. The Channel Search page opens. You can search by either entering text or by leaving the Channel field blank.
Note: Leaving the Channel field blank allows for searching all available options.

- Click .
Working with Channels
The Chanel Setup panel provides the information for the Channel requested and is also where you begin the process of adding new Channels to your database.
- From the search results, click
 to allow changes to the desired channel.
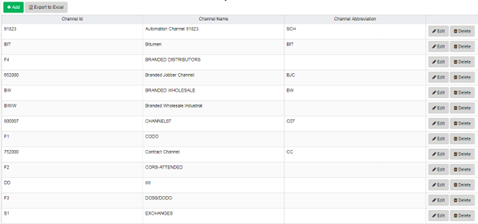
- To add a channel, click
 Enter the following information in the blank fields and click
  .
.
- Channel ID
- Specifies the ID code (assigned by your company) that maps to your ERP or billing system. Corresponds with Channel Name.
- Channel Name
- Displays the name assigned by your company (ex. Branded Distributors, Wholesale, etc.)
- Channel Abbreviation
- Contains a short abbreviation for the Channel name.
Setting up SoldTos
This page allows you to add SoldTos to your pre-populated list allowing for increased data integrity.
SoldTos are important for clients who are using the optional DTN TABS add-ons of the Allocation Viewer, Forecast, Enhanced Credit and Master Data modules.
SoldTos provide electronic bills of lading (BOLs) to your customers that utilize the DTN Fuel Admin™ application. A SoldTo can be assigned to a Seller Consignee, Marketer Consignee, Consignee group and/or Product and Credit Allocation alerts. A SoldTo identifies the customer that purchased the product.
Note: If you have chosen to use our optional Material Code Mapping Feature, please refer to the DTN TABS Material Code Mapping Supplement for more information on this page.
- From the DATA MANAGEMENT menu, select SoldTos/ShipTos. The Customer Search page opens.

Searching for SoldTos
The Customer Search panel searches by either text and then clicking ![]() or by leaving the Search field blank to search for all available options and clicking
or by leaving the Search field blank to search for all available options and clicking ![]()
You Add a new SoldTo from here and export your existing SoldTos/ShipTos to Excel.
Editing and Adding SoldTos
The SoldTo Setup panel provides the information for the SoldTo requested.

Here’s how to edit SoldTos:
- Once the search results display, select the desired SoldTo and click the Edit link to edit the information in the following fields.
- SoldTo ID
- Identifies the customer to whom the product is sold. The SoldTo ID maps to your ERP or billing system.
- SoldTo Name
- Displays the name of the page and report name for the customer purchasing product.
- Sales/Territory Manager
- Identifies the Sales/Territory Manager for the SoldTo provided by your ERP or billing system.
- Tax Exempt
- Indicates whether the customer is exempt from federal taxes.
2. Click the Save link.
Use the SoldTo Setup panel to add new SoldTos to your database.
Here’s how to add a SoldTo:
- Click Enter the following information in the blank fields:
- SoldTo ID
- Identifies the customer to whom the product is sold. The SoldTo ID maps to your ERP or billing system.
- SoldTo Name
- Displays the name of the page and report name for the customer purchasing product.
- Sales/Territory Manager
- Identifies the Sales/Territory Manager for the SoldTo provided by your ERP or billing system.
- Tax Exempt
- Indicates whether the customer is exempt from federal taxes.
2. Click the Save link.
Setting up ShipTos
The Customer Search page allows you to add ShipTos to your pre-populated list of SoldTos allowing for increased data integrity.
A ShipTo can be assigned to a Seller Consignee or Marketer Consignee. ShipTo identifies the destination for fuel orders. A ShipTo can identify either the customer and state of delivery, or the customer and the destination. ShipTo records also download the ShipTo number to your ERP or billing system instead of the consignee number utilized by the terminal or supply partner.
- From the DATA MANAGEMENT menu, select SoldTos/ShipTos. The Customer Search page opens.

Searching for ShipTos
The Customer Search panel searches by either text and then clicking ![]() or by leaving the Search field blank to search for all available options and clicking
or by leaving the Search field blank to search for all available options and clicking ![]()
Working with ShipTos
The SoldTo Setup panel provides the information for the ShipTo requested.
Here’s how to edit ShipTos:
- Once the search results display, select the desired SoldTo and click the icon

![]()
- Click the Edit link to edit the information in the following fields.
- ShipTo ID
- Identifies the customer to whom the product is sold. The ShipTo ID maps to your ERP or billing system.
- ShipTo Name
- Displays the name of the page and report display name for the customer to whom the product is sold.
3. Click the Save link.
The SoldTo Setup panel is also where you add new ShipTos to your database.
Here’s how to add a ShipTo:
- Select the desired SoldTo and click the Add ShipTo
- Enter the following information in the boxes:
- ShipTo ID
- Identifies the customer to whom the product is sold. The ShipTo ID maps to your ERP or billing system.
- ShipTo Name
- Displays the name of the page and report display name for the customer to whom the product is sold.
3. Click the Save link.
Setting up Seller Consignees
DTN TABS defines a consignee as the customer or the buyer of the product, a ShipTo location, or the bill to location of the customer.
The number could match your ERP or billing system where you are able to manage their creation or it could be a consignee number assigned by your supply partner. In the latter case, the usage of our ShipTo feature is recommended for ease of integration with your systems.
The assignment of Channel and SoldTo attributes are also recommended as they enable you to more efficiently group and manage consignees in your DTN TABS system.
- From the DATA MANAGEMENT menu, select
Searching for a Seller Consignee
The Search Seller Consignees panel allows you to retrieve information based on a keyword search.
If you have over 1,000 consignees in the database, you must enter an option in the Key Word field.
Here’s how to search for a consignee:
- Select the Search By arrow by selecting one of the below options:
- Consignee Name
- Consignee Id
- FEIN/Company ID
- Address1
- Phone
- City/Town
- State/Locality
- Postal Code
- Enter a keyword in the Key Word field based on the criteria selected in the Search By
- Click The Search Seller Consignee panel displays consignees based on the criteria.
Adding a Seller Consignee
Here’s how to add a consignee:
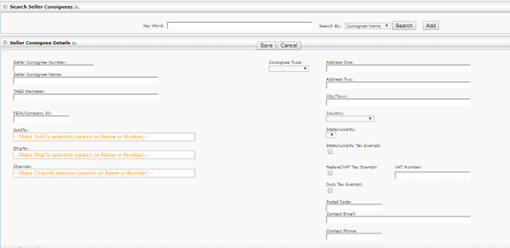
- Click The Seller Consignee Details panel displays.
- Enter the following information:
- Seller Consignee Number
- Displays a unique, 1-14 character, alphanumeric identifier for the “ship to location” buyer or “bill to location” buyer of the product. Assigned by your company and must match what is in the terminal database.
- Note: The Consignee Number must match the set up for the terminal and the Seller, character for character.
- Seller Consignee Name
- Specifies the Consignee’s proprietary name. If not entered, defaults to the Consignee Number.
- Note: The Seller Consignee Name field in DTN TABS has a 50-character limit and the usage of commas is prohibited.
- Best Practice Naming Convention includes:
- Customer Name – Destination State – Ship to – Sold to.
- For example: Mable Gas – TX – 12294 – 123968
- TABS Marketer
- Provides the DTN TABS Marketer authorized for this consignee, if any. This is a system-generated field.
- FEIN/Company ID
- Contains the Federal Employer Identification Number (FEIN) for the consignee.
- SoldTo
- Identifies the customer that purchased the product. This field is pre-populated from the SoldTos/ShipTos page.
- ShipTo
- Indicates the specific ShipTo for the customer in question. This field is populated from the SoldTos/ShipTos page.
- Note: ShipTo should be equal to the Consignee number being entered except in the case of a customer’s client.
- Channel
- Defines a specific channel of trade. This field is added in the Channels page.
- Address One, Address Two, City/Town, State/Locality, Postal Code
- Displays the address of the consignee, if entered.
- Contact Email and Phone
- Describes the contact information for the consignee, if entered.
- State/Locality Tax Exempt
- Indicates whether the consignee is exempt from state/locality taxes.
- Federal/VAT Tax Exempt
- Specifies whether the consignee is exempt from federal/VAT taxes.
- VAT Number
- Displays the VAT number assigned to the customer.
- Duty Tax Exempt
- Defines whether the customer is exempt from duty taxes.
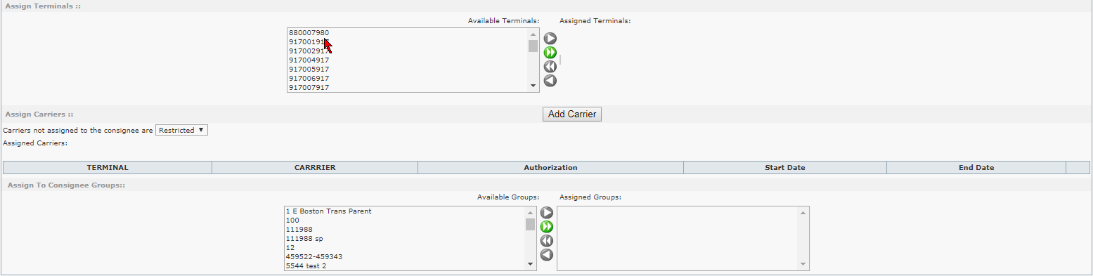
3. Select the terminals to assign to the seller consignee from the Assign Terminals The Assign Terminals panel provides a list of all terminals you have set up in your DTN TABS database and a list of all terminals currently assigned to the seller consignee. Terminals can be assigned to a seller consignee from this panel or assignments can be done via ADMLOD or our Master Data module.

4. Select the carriers to assign to the seller consignee from the Assign Carriers The Assign Carriers panel provides a list of all carriers you have set up in your DTN TABS database and a list of all carriers currently assigned to the seller consignee.
Note: This information is only necessary if the system default to perform a Carrier Authorization Check has been selected.
5. Select the groups to assign to the seller consignee from the Assign To Consignee Groups The Assign To Consignee Groups panel provides a list of all consignee groups you have set up in your DTN TABS database and a list of all groups to which the Seller Consignee is currently assigned. Seller consignees can be assigned to a group from this panel. Assignments can also be done via the Consignee Groups page, ADMLOD or our Master Data module.
6. Click ![]() .
.
Setting up Marketer Consignees
DTN TABS Marketer enables rack marketers to receive BOLs and use allocations to control purchases made on their accounts by their customers. DTN TABS Marketers can be associated with multiple sellers at a terminal. The TABS Seller must first approve the rack marketer as a DTN TABS Marketer. Once approved by a TABS Seller, the TABS Marketer can use the Marketer Consignees page to manage consignees.
- From the DATA MANAGEMENT menu, select Marketer Consignees. The Search Marketer Consignees page opens.
Searching for Marketer Consignees
The Search Marketer Consignees panel retrieves information based on consignee name, consignee ID, FEIN, address, email, phone, city, state or zip using a keyword search and clicking ![]()
Not entering an option in the Key Word field, and clicking ![]() displays all marketer consignees in the database
displays all marketer consignees in the database
Working with Marketer Consignees
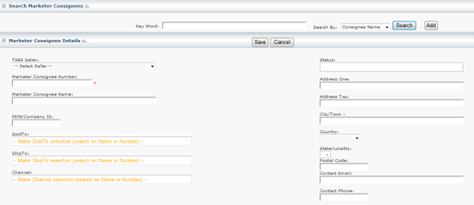
The Marketer Consignee Details panel displays the information for the consignee requested and begins the process of adding new Marketer Consignees to your database.
- Enter the following information and then click .
- TABS Seller
- Provides the DTN TABS Seller associated with the Marketer Consignee.
- Marketer Consignee Number
- Identifies the marketer consignee. This should be the same number as provided by the DTN TABS Seller for this consignee. Once saved, DTN TABS adds the Marketer’s 3-digit DTN TABS identifier to the end of the consignee number.
- Marketer Consignee Name
- Displays the Consignee’s proprietary name. If not entered, defaults to the Consignee Number.
- Best Practice Naming Convention includes:
- CUSTOMER NAME – DESTINATION STATE – SHIP TO – SOLD TO
- For example: MABLE GAS – TX – 12294 – 123968
- FEIN/ Company ID
- Contains the Federal Employer Identification Number (FEIN) for the consignee.
- Status
- Indicates the DTN TABS marketers’ status with the DTN TABS seller in regard to the marketer’s ability to view allocations. Options are:
- Approved with View: The Seller has approved the Marketer to view the Seller’s allocations.
- Approved No View: The Seller has approved the Marketer for TABS but has chosen not to allow the Marketer to view the Seller’s allocations.
- Not Approved: The Seller has deleted the Marketer from the TABS Marketers The Marketer is no longer approved to use DTN TABS for BOLs and allocations associated with the Seller.
- Disabled: The Seller has approved the Marketer, but the matching Seller’s consignee has been deleted.
- This is a read-only field.
- Indicates the DTN TABS marketers’ status with the DTN TABS seller in regard to the marketer’s ability to view allocations. Options are:
- SoldTo
- Displays the customer. This field is added in the SoldTos/ShipTos page and adds to the drop down.
- ShipTo
- Indicates the specific ShipTo for the customer in question. This field is populated from the SoldTos/ShipTos page.
- Note: ShipTo should be equal to the Consignee number being entered except in the case of a customer’s client.
- Channel
- Identifies a specific channel of trade. This field is added in the Channels page.
- Address One, Address Two, City/Town, State/Locality, Postal Code
- Displays the address of the consignee, if entered.
- Contact Email and Phone
- Describes the contact information for the consignee, if entered.
- State/Locality Tax Exempt
- Indicates whether the consignee is exempt from state/locality taxes.
- Federal/VAT Tax Exempt
- Specifies whether the consignee is exempt from federal/VAT taxes.
- VAT Number
- Displays the VAT number assigned to the customer.
- Duty Tax Exempt
- Defines whether the customer is exempt from duty taxes.
2. Assign the terminals at which your TABS Seller has approved the marketer consignee to load from the
3. Select the carriers to assign to the seller consignee from the Assign Carriers The Assign Carriers panel provides a list of all carriers you have set up in your DTN TABS database and a list of all carriers currently assigned to the seller consignee.
Note: This information is only necessary if the system default to perform a Carrier Authorization Check has been selected.
4. Select the groups to assign to the seller consignee from the Assign To Consignee Groups The Assign To Consignee Groups panel provides a list of all consignee groups you have set up in your DTN TABS database and a list of all groups to which the Seller Consignee is currently assigned. Seller consignees can be assigned to a group from this panel. Assignments can also be done via the Consignee Groups page, ADMLOD or our Master Data module.
5. Click ![]() .
.
Setting up Consignee Groups
Consignee groups arrange consignees (customers) for a specific business purpose such as reporting, mass edit allocations, and/or creation of credit and product allocations. Below are examples of frequently used groupings:
- SoldTo Customer Name – SoldTo
- Reporting puposes.
- SoldTo Customer Name – SoldTo – Channel (Class of Trade)
- Product Allocatoins at a Customer level.
- SoldTo Customer Name – SoldTo – Credit
- Credit Allocations and Reporting
- Channel (Class of Trade)
- Reporting and Product Allcoatoins at a Class of Trade level.
- From the DATA MANAGEMENT menu, select Consignee Groups. The Search Consignee Groups page opens.
Searching for Consignee Groups
The Search Consignee Groups allows you to search by Group Name and clicking ![]() or by leaving the Key Word field blank and clicking
or by leaving the Key Word field blank and clicking ![]() to search for all available options.
to search for all available options.
Working with Consignee Groups
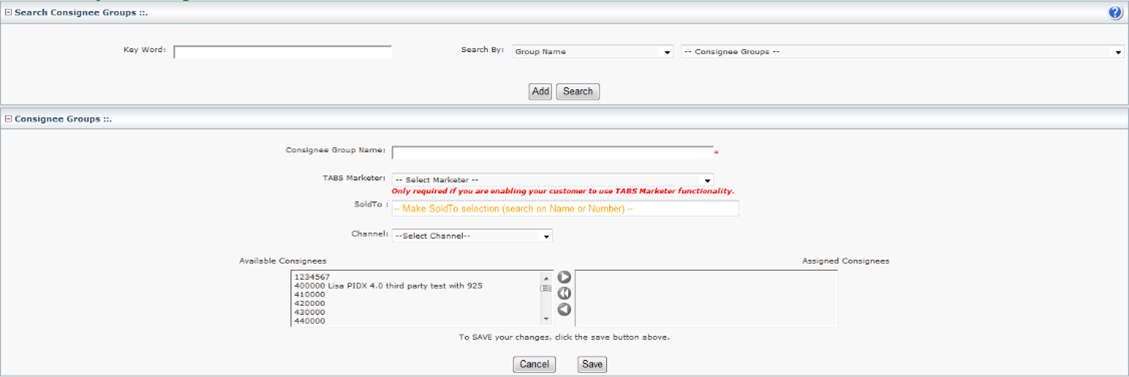
The Consignee Groups panel provides the information for the group requested and is also where you begin the process of adding new consignee groups to your database.
- Click .
- To add a Consignee Group, enter the following information:
- Consignee Group Name
- Displays a user-defined name for the consignee group.
- Consignee Group Status
- Indicates the DTN TABS marketers’ status with the DTN TABS seller in regard to the marketer’s ability to view allocations. Options are:
- Approved with View: The Seller has approved the Marketer to view the Seller’s allocations.
- Approved No View: The Seller has approved the Marketer for DTN TABS but has chosen not to allow the Marketer to view the Seller’s allocations.
- Not Approved: The Seller has deleted the Marketer from the TABS Marketer page. The Marketer is no longer approved to use DTN TABS for BOLs and allocations associated with the Seller.
- Disabled: The Seller has approved the Marketer, but the matching Seller’s consignee has been deleted.
- This is a read-only field.
- Note: This field displays when Marketer Consignees are active.
- Indicates the DTN TABS marketers’ status with the DTN TABS seller in regard to the marketer’s ability to view allocations. Options are:
- TABS Marketer
- Associates with a DTN TABS Marketer, if the group should be linked with the DTN TABS Marketer.
- SoldTo
- Identifies the customer who purchased the product. This field is added in the SoldTos/ShipTos page and adds to the drop down.
- Channel
- Identifies a specific channel of trade. This field is added in the Channels page.
- Available Consignees
- Lists the consignees available in your DTN TABS database. To add a consignee to a group move it from the Available Consignee column by highlighting and then clicking Move Right to move it to the Assigned Consignees column.
- Assigned Consignees
- Specifies the consignees in the selected group.
3. Click ![]() .
.
Setting up Third Parties
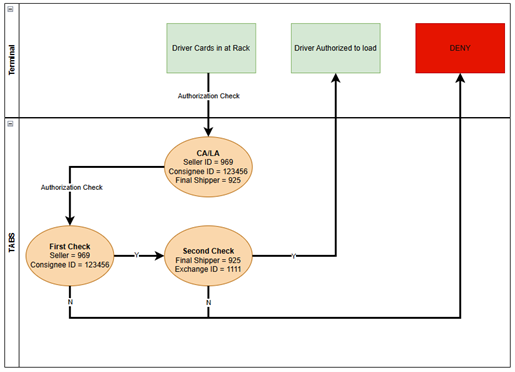
A 3rd party exchange exists when the ownership of product passes through more than one partner before reaching the ultimate buyer. Within DTN TABS, several layers of customer authorizations may be performed, producing multiple BOL records. Although there may be many partners involved, there is only one basic relationship – that of the seller to the customer.
If it has been indicated that a third party, such as a shipper, must also have a customer authorization performed, the shipper becomes the seller and the seller becomes the customer. The new seller to customer relationship is validated.
The final shipper ID is the last seller requiring a customer authorization. If only one check is performed, the final shipper ID will be the same as the seller ID. If the two fields are different, DTN TABS continues to chain through seller to customer relationships until the seller ID and final shipper ID are the same. This produces multiple credit authorizations and capture BOLs as needed.
Example:
- From the DATA MANAGEMENT menu, select Third Parties. The 3rd Party Chaining page opens.
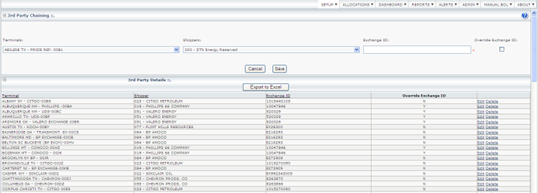
Adding Third Parties
The 3rd Party Chaining panel is where you begin the process of adding a 3rd party chain by selecting a terminal and shipper combination from the fields.
The 3rd Party Details panel displays the details of the 3rd Party chains already configured in your database. You can edit or delete chains from this page.
- Terminal
- Displays the proprietary name of the terminal.
- Shipper
- Defines the Seller ID for the shipper requiring a customer authorization and BOL.
- Exhange ID
- Identifies the Exchange ID for the shipper. This serves as the consignee number on the 3rd party transaction.
- Note: Use upper case letters and whole numbers only.
- Override Exchange ID
- Sends the actual consignee number instead of the Exchange ID on the resulting BOLS, if checked.
Setting up Carriers
The Carriers page adds the transport company that owns the trucks and hires drivers. The transporter of the product is the individual responsible for requesting authorization from the seller on behalf of the customer. The carrier may also be the customer. The Carrier panel allows a user to add a carrier to TABS.
Searching for Carriers
- To view carriers added to TABS, enter Key Word information and select an option from the Search By dropdown menu.
Working with Carriers
- To add a carrier, select Add and enter the required information.
- Alternately, select SCAC Master from the Search By dropdown menu.
- Enter your search criteria and click Search.
- If the carrier exists within DTN’s database, it will display.
- Select the carrier and click Save.
Setting up Customer Attributes
The Customer Attributes page allows for the setup of Credit Analyst, Credit Risk Category, Sales/Territory Manager, Pre-Payment Reason Code, and Credit Deny Reason Code. These optional data attributes can be utilized for data integrity between DTN TABS and an SAP system. These data attributes are displayed on the Dashboard as well as the Enhanced Credit Allocation Report.
Here’s how to add a Customer Attribute:
- Select from the drop down menu which Customer Attribute to setup. DTN TABS displays existing attributes that have already been setup.
- Click
 and add the attribute.
 - Click
 to save the attribute to the system .
Setting up GPO Reason Codes
The GPO Reason Codes page allows for configuration of reasons to assign to a GPO. GPO Reason Codes may be configured to identify reasons a GPO was requested or to display who approved a GPO. GPO Reason Codes should be tailored to your specific needs.
Here’s how to add a GPO Reason Code:
- Enter a GPO Reason Code in the text box.
- Click Add GPO Reason Code.
Setting up Prices
The DTN FastRacks system calculates an average gas and diesel price for each Spot Market. This calculation is based on all gross supplier prices that are posted through DTN and currently in effect.
Prices are updated daily based on the DTN FastRacks published schedule approximately 06:00 Central Time (CT).
If the average prices have not been updated in more than a day, DTN Operations receives an alert to correct the problem.
A product’s class is determined by mapping each PIDX family to either gas or diesel. This mapping is maintained by DTN.
This function is only available if you use Enhanced Credit.
 The Spot Market calculates the average gas and diesel price based on the terminal assigned TCN (Terminal Control Number). The DTN Fast Racks Pricing Region displays on the Terminal Details page (Data Management > Terminals > Terminal Details) . If no Fast Rack Region is set, an average from all Regions is used.
The DTN FastRacks Spot Price can be overridden by the Seller by editing the Price field.
Here’s how to change a price:
Start and End dates default to the current day.
- Click
- Enter a new price in the Price
- Enter a comment regarding the modified price in the Comments
- Click The new price, modified by, and modified date appear above the old price.
Here’s how to export several days of prices:
- Either modify the start and end dates or leave the end date at the current day default.
- Click
- Click
 Prices display for the current day.
Setting up Local Tax
The Local Tax Setup page defines a tax rate percentage per state/locality. This is an optional feature, maintained by the Seller, used in the calculation of the Credit Hold and estimated BOL cost. This feature is only available through Enhanced Credit. Please see the DTN TABS Enhanced Credit manual for more information.
Setting up Federal/VAT Tax
The Federal/VAT Tax Setup page specifies a federal tax amount in cents per gallon (value) or a percentage. This is an optional feature, maintained by the Seller, and used in the calculation of the Credit Hold and estimated BOL cost. This feature is only available through Enhanced Credit. Please see the DTN TABS Enhanced Credit manual for more information.
Setting up Duty Tax
The Duty Tax Setup page specifies a federal tax amount by country and by product in cents per desired unit of measure for weight and volume (value) or a percentage. This is an optional feature, maintained by the Seller, and used in the calculation of the Credit Hold and estimated BOL cost.
Duty Tax is currently only available for suppliers with Master Data Material Master and Enhanced Credit enabled.
Setting up Supply Events
Within DTN TABS, terminal specific supply event messages can be created, edited, and managed. The Supply Events data management page allows users to view, edit, delete and create new messages. Sending a new message, updating an existing event with additional information or notifying customers that an event has been resolved is easy and efficient. Please see the DTN TABS Supply Event training manual for more information.Setting up Truck Sizes
The Truck Size Setup page ensures that a customer can’t over lift his contract by a specified tolerance. DTN TABS checks that an entire truck can be loaded within the remaining allocation. If the remaining amount is less than the truck size and the Enforce full truck field (Allocations > Product > Manage ) is selected, then the product is not approved for loading.
Truck Sizes field definitions
The following fields are available on the Truck Size Setup page.
- Country
- Specifies the country matching the terminal for determining the truck size. The default is All Countries.
- Channel
- Describes the channel matching the ShipTo for determining the truck size used for Authorization Holds when Enforce Full Truck is selected.
- Sold To
- Identifies the SoldTo associated to the consignee for determining the truck size used for Authorization Holds when Enforce Full Truck is selected. This field is optional.
- Ship To
- Defines the ShipTo associated to the consignee for determining the truck size used for Authorization Holds when Enforce Full Truck is selected. This field is optional.
- Truck Size
- Provides the unit of measure quantity for authorization when Enforce Full Truck is selected.
- Unit of Measure
- Indicates the unit of measurement being used for the quantity loaded. Options are:
- Cubic Meters
- Gallons
- Imperial Gallons
- Imperial Ton
- Kilo Barrels
- Kilograms
- Liters
- Metric Ton
- Pounds
- Ton
- Indicates the unit of measurement being used for the quantity loaded. Options are:
Working with Truck Size
| Location: Data Management > Truck Sizes |
The Truck Size Setup search panel searches by either text or searching for all available options by leaving the search text field blank.
The Truck Size Setup panel provides the information for the truck size requested.
Here’s how to edit truck size:
- Once the search results display, select the desired truck size and click to edit the information in the fields.
- Click to save changes.
Adding trucks
| Location: Data Management > Truck Sizes |
Here’s how to add truck size:
- Click and add the information in the fields.
- Click to add the new truck size.
Master Data ShipTO
The Master Data Module allows your ERP system to communicate with TABS to add, update and delete ShipTo, SoldTo and Credit account information. Master Data ShipTos submitted through the Master Data module will display here if you are using this module. See the DTN TABS MasterData manual for more information.
The ShipTo in the ShipTo data feed creates a ShipTo Consignee Group to “lockout” a ShipTo customer from lifting product, to identify state taxability, to state whether the ShipTo is active or inactive and to assign the terminals and products that can be lifted. Specifics around the products contract are also provided. The ShipTo Consignee Group is created by assigning consignees to the ShipTo Consignee Group. The required data elements for ShipTo are:
- ShipTo Name
- ShipTo Number
- Sales Area – Sales Org
- Sales Area – Distribution Channel
- Sales Area – Division
- Channel
- Locked Out
- Lockout Reason
- Active
- Tax Exempt State
- Address 1
- Address 2
- City/Town
- State/Locality
- Postal Code
- FEIN
- List of authorized terminals
- Authorized PIDX Codes per terminal
- Credit Terms
- Country
Setting up Mapping
Mapping within DTN TABS allows for customization of functions and meets locality specific requirements for loading. For more information, please see the DTN TABS® Mapping Supplement.