Setting up Allocations
Allocations control your customers based on factors such as supply needs (product) which make it possible to perform controls at a specific product family or class of products. There are differing strategies on how to utilize product allocations.
DTN recommends performing product allocations through a specific terminal or terminal group by SoldTo.
Customers’ credit can be controlled through the Enhanced Credit module (ECM). The ECM tracks customers’ liftings regardless of what terminal and product the driver lifts. DTN recommends setting the credit control at All Terminals and by a specific SoldTo.
DTN TABS provides a wealth of reports that can help you zero in on the information you need, when you need it. The types of reports you can create include:
Note: See the DTN TABS Best Practices Quick Guide for more information on best practices for allocation controls.
About the Product Allocation Manage Page
The Product Allocation Manage (Allocations > Product > Manage) page allows the setup of both product and credit allocations. The following panels display on this page.
Choose Allocations panel: Provides a search tool for finding an existing allocation or for selecting a Terminal or Terminal Group and Consignee or Consignee Group for setting up a new allocation.
Note: When opening the Product Allocation Manage page, only the Choose Allocations panel appears. Additional panels are visible depending on search results such as Supply Events and Product Details.

Allocation Header Details panel: Defines information about the purpose of the allocation.

Supply Events panel: Contains a summary of any supply events that affect the selected product allocation record.
Note: See the DTN TABS Supply Event Training Manual for information on Supply Events.
![]()
Product Allocation Details panel: Provides a summary of any product allocations for the selected allocation record.

Available Product Allocations panel: Displays a list of current product allocations for the terminal or terminal group.
![]()
Digital Commerce Product Allocations panel: Displays a list of current Digital Commerce allocations. Note: Digital Commerce functionality must be enabled for this to display.
![]()
Retrieving an Allocation
Here’s how to pull up an existing allocation or to create an allocation:
- From the Search By arrow next to the Terminal or Terminal Group field, select one of the options:
- Terminal & TG
- Terminal by Name
- Terminal Group
- Terminal by SPLC
- Terminal by City
- Terminal by Plant
- From the Search By arrow next to the Consignee or Consignee Group field, select one of the options
- Consignee & CG
- Consignee Name
- Consignee Group
- Consignee #
- Consignee by City
- Channel as Consignee/CG
- SoldTo as Consignee/CG
- Click inside the Terminal or Terminal Group field to select a terminal or terminal group. Once the terminal or terminal group has been selected, DTN TABS populates the Consignee or Consignee Group field with consignees/consignee groups that have been assigned to the selected terminal or terminal group.
- Click inside the Consignee or Consignee Group field to select a consignee or consignee group to filter results.
Note: If you select a consignee or consignee group first (instead of a terminal or terminal group), the Terminal or Terminal Group field populates with the terminals that are assigned to the selected consignee or consignee group.
- Click Include Expired Allocations if you wish to see any allocations that are expired.
Note: Selecting this option is recommended as it provides you with all potential records, if they exist.
- Click
 . The Allocations Setup page expands to display the selected record, or if no allocation record exists, the New Allocations panel opens.
Viewing an Allocation
Here’s how to view a product allocation:
- In the Available Product Allocations panel, click the desired allocation name listed under the Name This panel displays product allocations for the selected terminal/terminal group and selected consignee/consignee group combination.

The following information appears for each allocation:
- Name
- Displays the user-defined name of the product allocation.
- Prod/Prod Grp/Prod Fam
- Identifies the product, product group, or product family to which the product allocation applies.
- Alloc Type
- Specifies the type of product allocation. Options are:
- Flat
- Hierarchical
- Specifies the type of product allocation. Options are:
- Refresh Summary
- Summarizes refresh periods for the product allocation record.
Adding a Product Allocation
You can control supply at specific product family or class of products by adding product allocations.
DTN recommends working with your terminal product allocation personnel to make sure that you are allocating at a level most consistent with the terminal product allocation needs in use by and available at the terminal.
Product Availability: Once you have set up an allocation for a product, DTN TABS automatically checks to be sure the product is available at the terminal for the consignee. If the allocation is set up for a product at a terminal group level, the system automatically checks to be sure the product is available to that consignee through at least one of the terminals in the group. If the product is not available, the system generates a message.
Flat Product Allocations: Flat product allocations can be set up to refresh on a daily, weekly, monthly, and/or tri-monthly basis. If needed, you can set up a custom refresh period. For each period, you can designate an allocation amount that is set independently of the others. For authorization purposes, the system applies the strictest allocation setting.
Hierarchical Product Allocations: Hierarchical product allocations can beset up automatically to be applied in a stair step or hierarchical fashion. Once you enter your base or starting refresh period and starting amount, the system calculates and auto-fill amounts and dates for the lower periods. For example, when you designate monthly as your base, and select weekly as your next stair step down, the system calculates a start amount and refresh date for the weekly refresh period.
DTN recommends only doing product allocations on specific supply points/customer levels and not creating allocations that are generic. While the system supports such configurations, generic allocations are not recommended.
When you start to create a product allocation on one product for a client, allocations must be in place for all other products for that client. If this is not done, the system only returns product authorizations for products that belong to an allocation that is active and has a remaining amount.
To avoid this, allocations should be set up as a flat daily allocation for each product class that needs to be cleared without control. These allocations can be for 9,999,999 gallons with a refresh of the same volume. Then, clear the additional products at a volume that, in normal circumstances, would never be met. These types of records should be placed at the same level the controlling allocations are placed and not at a terminal/all consignees level. This keeps the system consistent and prevents issues with multi-level conflict.
Here’s how to add a product allocation:
- From the Allocations menu, select Manage under the Product list.
- Enter or select the Terminal or Terminal Group for the allocation.
- Enter or select the Consignee or Consignee Group for the allocation.
- Click
 . The page expands to include additional panels for allocation information. If there is an existing allocation it will display the allocation.
- In the New Allocation panel, select one of the following authorization options:
- Open
- Indicates that the customer has no controls at this level and can lift any product available to them at the terminal/terminal group in question.
- Deny
- Determines that the customer is locked out at this level and cannot load any products at the specified terminal/terminal group.
- If this option is checked, the user must enter a reason for the deny in the Comments field if that option has been selected as a system-wide default through the Defaults page.
- One-Time
- Specifies that the customer can lift any product available to them at the terminal/terminal group but is limited to one load. Once the load has been completed, a flag is set to identify the load has been lifted and the customer is locked out until the flag is reset.
- Note: When the one-time allocation has been used, the system automatically selects the Auth Used check box. This prohibits the consignee/consignee group from loading any additional product until the record has been updated.
- Credit and /or Product (L) or Product (E)
- Determines that the customer is being allocated by the Apply Credit Allocation or Apply Product Allocation option based on the selection of the Apply Credit or Apply Product option.
- See the Product Allocations section in this training manual. See the DTN TABS Enhanced Credit Training Manual for information on credit allocations.
- If an allocation is created, it is not applied unless the Apply Credit Allocation or Apply Product Allocation option has been selected.
- Note: Only an option if legacy credit is in use. If Enhanced Credit is in use, Product will be the only option.
- Auth Used
- Indicates that the one-time authorization has been used. This prohibits the consignee/consignee group from loading any additional product until the check box has been cleared.
- Enforced Full Truck For Product Allocation(s)
- Determines if Full Truck functionality should apply to the allocation. Truck Sizes are configued under Data Management.
- Apply Credit Allocations
- Activates any attached credit allocations.
- Note: Only an option if legacy credit is in use
- Apply Product Allocations
- Activates any attached product allocations.
- Note: If the Apply Credit Allocation or Apply Product Allocation option is selected, but there is no credit or product allocation record attached, the system issues a Deny to the customer.
- Only an option if legacy credit is in use.
- Comments
- Contains comments regarding the allocation, including why a customer has been set to Deny. This field can also be used to note times of changes done to records such an ADMLOD file. Comments are limited to 2000 characters.
- Allocation Time Zone
- Indicates the time zone to be applied to the allocation. This defaults to the Time Zone Settings defined through the Terminal Setup page for the terminal or to Eastern Standard if a Terminal Group is selected, but can be changed, as needed.
- Day-light Savings Time
- Identifies that Daylight Savings Time (DST) is observed for the selected Allocation Time Zone if selected. The system automatically adjusts the time zone for the allocation to DST as needed.
7. In the Product Allocation Detail panel, click ![]() .
.
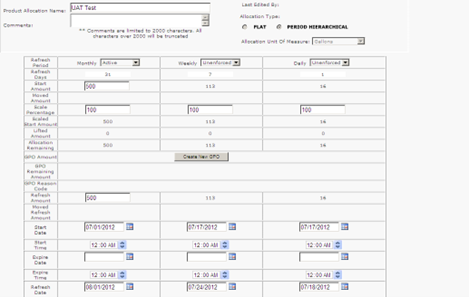
The Product Allocation Detail panel provides a summary of any product allocations for the selected allocation record. You can set up an allocation by product, product group, or product family. You can also define whether the allocation is flat or period hierarchical, and then set a refresh period, refresh amount, etc.
Select or enter the following information for a product allocation:
- Restricted to Assigned Products
- Enables the Products, Product Groups, and Product Families menus to display only those items that have been assigned to the selected terminal or terminal group.
- This reduces the chance of setup errors.
- Products/Product Groups/Product Families
- Contains the lists of products, product groups and product families. DTN recommends allocating on product groups as a best practice.
- The allocation is enforced based on the selection.
- Product Allocation Name
- Identifies the allocation name.
- DTN recommends a standard and consistent use of naming conventions.
- Comments
- Displays comments about the product allocation. Although comments are not required, they are useful for determining who created the record and why it was created.
- Allocation Unit of Measure
- Specifies the unit of measure for the allocation. Options are
- Cubic Meters
- Gallon
- Imperial Gallons
- Imperial Ton
- Kilo Barrels
- Kilograms
- Liters
- Metric Ton
- Pounds
- Ton
- Specifies the unit of measure for the allocation. Options are
- Allocation Type
- Defines one of the following options:
- Flat – Flat product allocations can be set up to refresh on a Daily, Weekly, Monthly, and/or Tri-monthly basis. If needed, you can set up a Custom refresh period. For flat allocations, each period can assign an allocation amount that is set independently of the others; therefore, providing more flexibility in the way the allocations with different time periods can be implemented. For authorization purposes, DTN TABS applies the strictest allocation setting.
- Hierarchical – Hierarchical product allocations make it possible to implement an automated stair step or hierarchical approach to allocations. Once you enter your base or starting refresh period and starting amount in, DTN TABS calculates and auto-fill amounts and dates for the next selected stair step(s) down.
- For example, when you designate Monthly as your base, and select Weekly as your next stair step down, the system calculates a start amount and refresh date for the weekly refresh period. Then, whichever time period runs out of allocation first denies the customer from lifting.
- For either Flat or Hierarchical, enter the following:
- Active
- Indicates that the product allocation is in effect.
- Unenforced
- Specifies that the particular period is set as unenforced. This is used for reporting purposes; keeping track of gallons lifted but not shutting off the customer if the amount exceeds the allocation. At least one time period must be active for allocation controls.
- Inactive
- Sets up an allocation to be turned on at a later date. The system considers these allocations as dormant. If all time periods are set to Inactive, the system denies the customer. This field is only available to flat allocations.
- Refresh Period
- Specifies one of the following refresh periods:
- Monthly (available for hierarchical and flat allocations)
- Tri-Monthly (only available for flat allocations)
- Weekly (available for hierarchical and flat allocations)
- Daily (available for hierarchical and flat allocations)
- Custom (only available for flat allocations)
- Specifies one of the following refresh periods:
- Refresh Days
- Adds the number in the Refresh Days field to the start date to calculate the next refresh date.
- Start Amount
- Provides the initial amount authorized for product for the customer. The numeric value corresponds to gallons. This amount is refreshed by the specified refreshed amount at the Next Refresh Date field.
- Note: If the Credit and/or Product check box is selected, you must enter a start amount greater than zero. If not, the system issues a Deny to the customer.
- Scale Percentage
- Indicates the percentage the allocation start amount is increased /decreased. To enter a decrease, use a minus sign (-) before the percentage.
- By using the scale percent function, you can increase or decrease the start amount without having to actually make any modifications to the number in the start amount field.
- Scaled Start Amount
- Specifies the scaled start amount. This amount is calculated as follows:
- Start Amount x Scale Percent
- Specifies the scaled start amount. This amount is calculated as follows:
- Lifted Amount
- Provides the amount lifted from the terminal or terminal group.
- GPO Allowance
- Describes the amount that exceeds the allowed allocation and that incrementally lifted amount of the GPO. This displays only once GPO is entered.
- Allocation Remaining
- Identifies the remaining amount upon completion. The formula includes, the system subtracting the gross gallons lifted which generates the remaining amount.
- GPO Amount
- Displays the amount allowed if a GPO is in place. Click Create New GPO to create a GPO record that allows the customer to lift an additional load if their product allocation has reached 0 (zero).
- GPO Remaining Amount
- Displays the amount remaining on a GPO.
- Refresh Amount
- Describes the number of gallons to which the start amount is automatically refreshed on the Next Refresh Date field.
- Moved Refresh Amount
- Provides the moved allocation refresh volume, if using Move Allocations functionality.
- Carry Forward
- Indicates any leftover allocation is added to the start amount on the Next Refresh Date field, if checked.
- Note: Only available on Flat product allocations.
- Start Date
- Contains the date on which the product allocation goes into effect.
- Start Time
- Describes the time which the product allocation goes into effect
- Note: The Start Date/Time entered here does not go into effect until you select the Schedule Product Refresh option on the Defaults screen. If the Schedule Product Refresh option is not selected, the system applies the refresh amount when the first authorization request is received on or before date in the Next Refresh Date field.
- Expire Date
- Specifies the date the product allocation expires or no longer be in effect. If a date and time is not entered in the Expire Date/Time field, the allocation continues to refresh indefinitely. DTN recommends keeping this field blank unless the allocation is no longer needed.
- Expire Time
- Defines the time the product allocation expires or no longer is in effect. DTN recommends keeping this field blank unless the allocation is no longer needed.
- Refresh Date
- Displays a date based on the Start Date and Refresh Period fields. The system automatically fills in this field.
- Refresh Time
- Identifies the time the record is refreshed.
- Note: The Refresh Date/Time entered here does not go into effect until you select the Schedule Credit Refresh option on the Defaults page. If the Schedule Credit Refresh option is not selected, the system applies the refresh amount when the first authorization request is received on or before the date in the Next Refresh Date field.
- Active
Scroll back to the top of the Product Allocation Details panel and click ![]() .
.
Deleting an Allocation
Allocations may be deleted from TABS but note that any reference to the allocation will no longer be visible within your account.
Here’s how to delete an allocation:
- From the Allocations menu, select Manage for either Product or Credit.
- Enter or select the terminal or terminal group for the allocation.
- Enter or select the consignee or consignee group for the allocation.
- Click . The page expands to include additional panels for allocation information.
- To delete:
The entire record: If multiple allocations exist, Delete All displays at the top of the page. Click ![]() at the top of the page. A message apears confirming the deletion.
at the top of the page. A message apears confirming the deletion.
An attached product record: Select the product record to be removed from the product details panel of the page and click ![]() within the details panel to remove the product allocation record.
within the details panel to remove the product allocation record.
An attached credit record: In the Credit Allocation Details panel, click ![]() next to the credit record to remove, then click
next to the credit record to remove, then click ![]() to save the change made to the allocation record.
to save the change made to the allocation record.
Note: Any deletion that results in either no allocation record being retained for a consignee/consignee group at a terminal/terminal group, or no valid credit/product record on an allocation that is set to Credit and/or Product, results in a denial at the terminal.
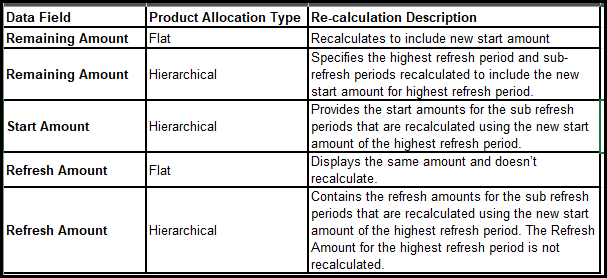
Changing a Start Amount
As supply (product) needs change and adjustments need to be made, you can modify the Start Amount field for any level of a flat product allocation and for the highest refresh period level of a hierarchical allocation. The new start amount becomes effective as soon as you click ![]() . When you change the start amount, the system performs the following re-calculations:
. When you change the start amount, the system performs the following re-calculations:
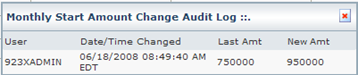
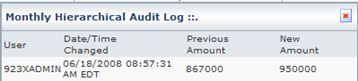
When you change the start amount for a Product Allocation, the system generates an audit log to track changes to the allocation. You can access the audit log for each modified start amount by clicking Audit Log.

![]()
A pop-up window displays the log of changes for the Start Amount that occurred during the current refresh cycle. The log displays the name of the user who made the change, the date and time the change occurred, the previous Start Amount and the new Start Amount.
To close the box, click ![]() .
.
See the Allocation Historical Time-Span Report section below for more information on changes to an allocation.
Mass Edit Allocations
The Mass Edit Allocations page adjusts several product allocations at once, when supply fluctuations occur at a terminal or terminal group instead of increasing every allocation at specific terminal by 10% or temporarily shutting everyone off by setting the scale percent to 0%.
The Mass Edit Allocations page is the most effective tool within the DTN TABS UI to make such changes at once. The mass changes can be made effective immediately or at a scheduled date and time.

Searching for Allocations to edit
- From the Allocations menu, select Mass Edit under the Product
- Select the criteria for the allocations you want to change by using the following fields:

- Scheduled Changes
- Specifies the mass edit allocations scheduled to go into effect at a specified date and time.

- Search by Field for Terminals & Terminal Groups
- Select one of the following options:
- Terminal & TG
- Terminal by Name,
- Terminal by Group
- Terminal by SPLC
- Terminal by City
- Terminal by Plant
- Then select your terminal or terminal group from the Terminal or Terminal Group drop-down list box.
- Select one of the following options:
- Search by Field for Consignee & Consignee Groups
- Select one of the following options:
- Consignee & CG
- Consignee by Name,
- Consignee by Group
- Consignee by SPLC
- Consignee by City
- Channel as Consignee/CG
- SoldTo as Consignee/CG
- Then select your consignee or consignee group from the Consignee or Consignee Group drop-down list box.
- Select one of the following options:
- Restrict to Assigned Products
- Displays only products available at the selected terminal or terminal group and consignee or consignee group combination as well as for product groups and product families.
- Products: Provides the specific products from the Products arrow.
- Product Groups: Contains the specific product groups from the Product Groups arrow.
- Product Families: Lists the specific product groups from the Product Families arrow
- Refresh Type: Indicates the refresh type for the allocation. Select one of the following options:
- All
- Daily
- Weekly
- Monthly
- Tri Monthly
- Custom
- Prod rem amt: Identifies the amount of product left of the original allocation. Enter an amount in this field and a corresponding option and the system searches for any product allocations with a remaining amount that matches your criteria. Options are:
- =
- <
- <=
- >
- >=
- between
- Status: Describes the status of the allocation. Options are:
- All
- Active
- Inactive
- Unenforced
- Scaleback %: Determines the percentage of temporary increase/decrease for the selected product allocation. Enter an amount in this field and a corresponding option The system searches for any product allocations with a scaleback percentage that matches your criteria. Options are:
- =
- <
- <=
- >
- >=
- between
- Prod next ref date: Provides the date and time a product is refreshed. Select a date and time and the system searches for any allocation records whose next refresh date and time matches your criteria. Options are:
- =
- <
- <=
- >
- >=
- between
- Indirect Allocations: Contains an indirect allocation that may apply indirectly to the selected terminal and consignee combination. For example, an allocation that is applied to all terminals would be an indirect allocation.
- Expired Allocations: Specifies allocations that have a designated date and time for when the allocation no longer controls the customer. The system stops reviewing expired allocations for controls.
- Displays only products available at the selected terminal or terminal group and consignee or consignee group combination as well as for product groups and product families.
3. Click ![]() . The matching allocations display in the Allocation Detail pane.
. The matching allocations display in the Allocation Detail pane.
Allocation Changes Panel
Once a search has been completed and allocations are available for selection in the Allocation Details panel, you will then need to fill in the Allocation Changes panel:
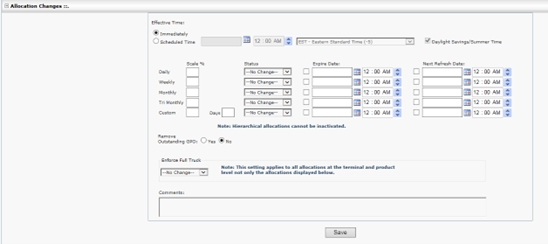
- Effective Time
- Options are:
- Immediately: Changes will go in to effect at the moment the change is saved.
- Scheduled Time: Sets the date and time that the mass edit changes are to go active.
- Options are:
- Refresh Type
- Indicates the refresh type for the allocation. Select one of the following options:
- All
- Daily
- Weekly
- Monthly
- Tri Monthly
- Custom
- Indicates the refresh type for the allocation. Select one of the following options:
- Scale %
- Updates the allocation period scaling percentage to this value.
- Status
- Options are:
- No Change
- Active
- Inactive
- Unenforced
- Options are:
- Expire Date
- Updates the expired date on the allocation period to the value entered in this field.
- Next Refresh Date
- Revises the next refresh date on the allocation period to the value entered in this field.
- Remove Outstanding GPO
- Options are:
- Yes
- No
- Options are:
- Enforce Full Truck
- Options are:
- No Change
- Yes
- No
- Note: This setting applies to all allocations at the terminal and product level not only the allocations displayed in the Allocation Details panel.
- Options are:
- Comments
- Allows free text comments about the reason for the Mass Edit. This field is useful for scheduled events to communicate to other users the reasons this event was scheduled.
Allocation Details Panel
The Allocations Detail panel shows the records that are available to modify from the Mass Edit page. You can select the allocation records to change using the details you provided in the Allocation Changes panel.
Mass Delete Allocations
It is recommended that routine maintenance be performed on your DTN TABS database. This routine maintenance includes deleting product allocations that are no longer in use.
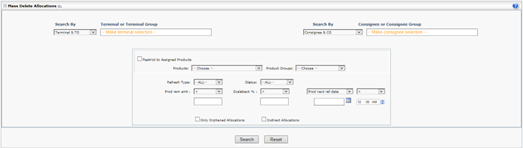
The Mass Delete Allocations (Allocations > Product > Mass Delete) page is effective tool for deleting a number of allocations at once for a specific terminal or terminal group. The page shows you any allocation records that are orphaned due to removed setups or broken linkages caused by consignee deletions.
Allocations can be filtered by terminal or terminal group and consignee or consignee group as well as by channel or SoldTo. You can select all or any combination of allocations to be deleted. If an authorization point has no remaining allocations, you can delete it, set it to deny or set it to open.
Note: All allocation history, alerts, GPOs and pre-approved overrides tied to the deleted allocation are permanently deleted from DTN TABS.
Mass Deleting Product Allocations
Here’s how to mass delete product allocations:
- From the Allocations menu, select Mass Delete from under the Product The Mass Delete Allocations page opens.
- Enter or select the terminal or terminal group for the allocation you want to delete.
- Enter or select the consignee or consignee group for the allocation you want to delete.
- Select Restrict to Assigned Products to display only products available at the selected terminal or terminal group and consignee or consignee group combination as well as for product groups and product families.
- Products
- Provides the specific products from the Products arrow.
- Product Groups
- Contains the specific product groups from the Product Groups arrow.
- Product Families
- Displays the specific product family from the Product Family arrow.
- Refresh Type
- Indicates the refresh type for the allocation. Select one of the following options:
- All
- Daily
- Weekly
- Monthly
- Tri Monthly
- Custom
- Indicates the refresh type for the allocation. Select one of the following options:
- Prod rem amt
- Identifies the amount of product left of the original allocation. Enter an amount in this field and a corresponding option and the system searches for any product allocations with a remaining amount that matches your criteria. Options are:
- =
- <
- <=
- >
- >=
- between
- Identifies the amount of product left of the original allocation. Enter an amount in this field and a corresponding option and the system searches for any product allocations with a remaining amount that matches your criteria. Options are:
- Status
- Describes the status of the allocation. Options are:
- All
- Active
- Inactive
- Unenforced
- Describes the status of the allocation. Options are:
- Scaleback %
- Determines the percentage of temporary increase/decrease for the selected product allocation. Enter an amount in this field and a corresponding option. The system searches for any product allocations with a scaleback percentage that matches your criteria. Options are:
- =
- <
- <=
- >
- >=
- between
- Determines the percentage of temporary increase/decrease for the selected product allocation. Enter an amount in this field and a corresponding option. The system searches for any product allocations with a scaleback percentage that matches your criteria. Options are:
- Prod next ref date/Expire date
- Uses the date and time a product is refreshed or expired. Select a date and time and the system searches for any allocation records whose next refresh or the expired date and time matches your criteria. Options are:
- =
- <
- <=
- >
- >=
- between
- Uses the date and time a product is refreshed or expired. Select a date and time and the system searches for any allocation records whose next refresh or the expired date and time matches your criteria. Options are:
- Only Orphaned Allocations
- Shows allocations that are in a state where they are classed as orphaned either due to the deletion of a consignee or the removal of a terminal assignment that causes the Consignee Group used for allocations to no longer have a single consignee associated with a terminal used for the authorization point.
- Indirect Allocations
- Contains an indirect allocation that may apply indirectly to the selected terminal and consignee combination. For example, an allocation that is applied to all terminals would be an indirect allocation.
5. Click ![]() . The Allocations Detail pane appears.
. The Allocations Detail pane appears.

6.Select the allocations to delete. Select the Select All box to delete all the allocations on the page.
7. Select one of the following options for the Action to perform on allocation points with no remaining allocations field:
-
- Delete
- Deny
- Open
Note: This doesn’t change an authorization point that has credit allocations attached and is active, but only changes the authorization point to the chosen option if there are no more product allocation records attached to the allocation. On hierarchical product allocations, if you delete the parent month (i.e., Monthly/Weekly/Daily and you delete Monthly,) you also delete the sub-refresh periods on the allocation (i.e., Weekly and Daily).
8. Click ![]() . A confirmation window opens.
. A confirmation window opens.
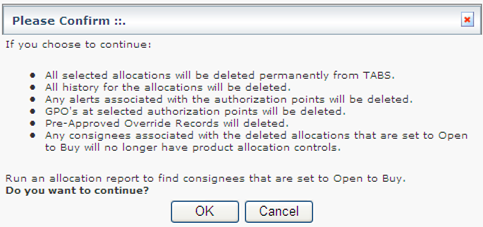
9.Click ![]() to confirm deletion.
to confirm deletion.
Move Allocations
When supply constraints prevent customers from lifting product at their primary terminal, a supplier needs the ability to move (add) the volumes of selected allocations from the primary terminal to a back-up terminal while keeping allocations intact at the source terminal. Once the supply constraint is resolved, the destination allocations need to be set back to normal lifting conditions.
Note: GPOs will not be moved from the source terminal to the destination terminal.
- Listed below are some common settings:
- Move all allocations from a given terminal or tied directly to a specified Terminal Group.
- Move all allocations at a terminal for a given Class of Trade (COT),
- Move all allocations at a terminal for the selected Products/Product Groups/Product Families.
- Move selected individual allocations at a terminal.
- Move all allocations at a terminal for the selected refresh period (for example, daily, weekly, etc…).
- Move some allocations to one backup terminal and others to a different terminal. For example, the supplier may have separate gas and distillate backup terminals.
More Event Setup
Move Events are created by accessing the Move Events page from the Allocations menu and selecting Move under the Product list.
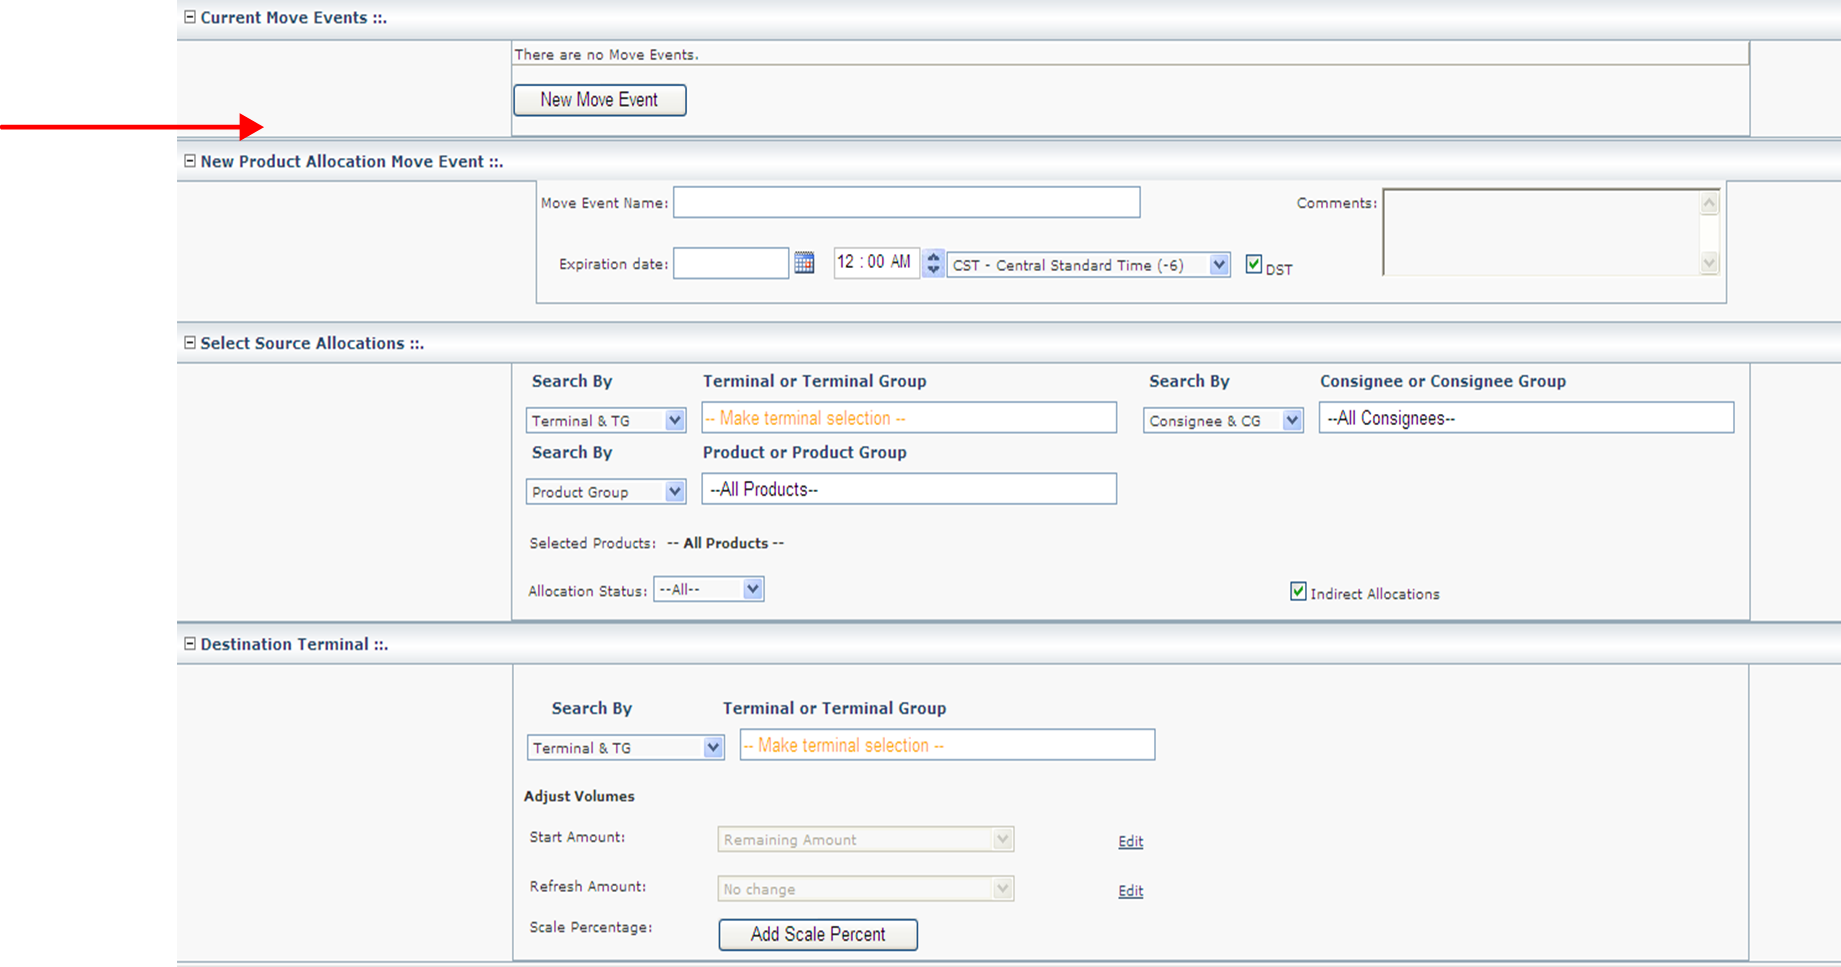
If any scheduled events exist, they are available in the Current Move Events panel for editing and deletion.
If none exist, the below screen displays. To create a new Move Event, select ![]() .
.
![]()
A source terminal or terminal group may be part of multiple pending or active move events. However, the source and destination product authorization point must not be part of another pending or active move event.
Note: Click ![]() to display the below panels.
to display the below panels.
This page has 4 panels:
- New Product Allocation Move Event: Contains the name of the new move event. Enter the name of the new move event (cannot exceed 100 characters) in the Move Event Name field. Expiration date lets you choose the reset date and time, which must be in the future.
- Once the reset day occurs, the move event no longer displays under current move events. The destination terminal keeps the remaining amount of the original source allocation unless this is manually removed. The source terminal’s allocation is not impacted by the move event.
- Select Source Allocations: Provides the ability to select the source Terminal/Terminal Group and the Consignee/Consignee Group as well as the Product/Product Group for moving the allocation.
- Destination Terminal: Allows you to select the destination Terminal/Terminal Group to which the Source allocations are moved to. Under Adjust Volumes, the Start Amount and the Refresh amount can either be left as is or modified by clicking on the edit button.
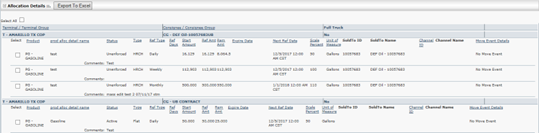
- Allocation Details: Displays allocations viable to moving based on the terminal/terminal and consignee/consignee group source and the terminal/terminal destination.
Creating a New Move Event
Here’s how to create a new move event:
Note: Active move events display in the Current Move Events panel. Before creating a new move event, identify the allocations to be moved and verify the allocations match at the destination terminal.
- From the Allocations menu, select Move under the Product list.
- Identify the allocations to move and verify an allocation matches at the destination terminal.
- Click
 .
.
- Enter a move event name in the Move Event

Note: The name cannot exceed 100 characters.
- Enter information in the remaining fields on the New Product Allocation Move Event
- From the Select Source Allocations panel, select the terminal or terminal group to attach the source allocation.
- Enter information in the remaining fields of the Select Source Allocations
- Enter the information in the fields of the Destination Terminal panel.
- Search By
- Search and select the destination terminal for the move event.
- Adjust Volumes
- Options are:
- State Amount
- Remaining Amount – Move amount remaining on the allocation.
- Days of Supply – Calculates the amount to move based on the days of supply.
- Refresh Mount
- Options are:
- No Change – Uses the value from the target allocation.
- Entire Refresh Amount – Uses the refresh amount from the source allocation.
- Days of Supply – Calculates the refresh amount from the days of supply.
- Options are:
- Scale Percentage
- Allows to scale the destination allocation.
- State Amount
- Options are:
- Product
- Refresh Period
- Options are:
- Daily
- Weekly
- Monthly
- TriMonthly
- Custom
- Options are:
- Scale Percent
- Refresh Period
9. Click ![]() and the information displays in the Allocation Details
and the information displays in the Allocation Details
10. In the Allocation Details panel, review the match types listed and click one of the following:
![]() : After you have made a direct/near match and selected the allocations you want to move, you have the option to move the event now or wait until later. The pending status makes it possible to activate the move event at a later date. You can change a move event from pending to active by going to the Allocations menu and selecting Move under the Product list. Click the Edit link next to the pending allocation and click
: After you have made a direct/near match and selected the allocations you want to move, you have the option to move the event now or wait until later. The pending status makes it possible to activate the move event at a later date. You can change a move event from pending to active by going to the Allocations menu and selecting Move under the Product list. Click the Edit link next to the pending allocation and click ![]() . This will change the pending allocation to an active move event allocation.
. This will change the pending allocation to an active move event allocation.
![]() : Activates the Move Event until the expiration date that was set.
: Activates the Move Event until the expiration date that was set.
![]() : Exports pending or active allocations to an excel spreadsheet.
: Exports pending or active allocations to an excel spreadsheet.
Scale Calculator
Scale Calculator will allow a user to scale back allocation amounts based on channel using a targeted volume amount instead of a scale percentage. It will take inputed criteria, look at the current allocation(s) and determine what the scale percent needs to be to get to your targeted amount in either gallons or barrels.
Pre-Approved Product Overrides (PAPO) and Global Product Overrides (GPO) Setup
The Product Override Settings page enables administrators to set parameters governing the approvals and setup of both Pre-Approved Product Overrides (PAPO) and Global Product Overrides (GPO). By establishing these administrative settings, the risk of error is reduced for allowing too many PAPO loads.
From the Admin menu, select GPO under the Configuration The Product Override Settings page opens.
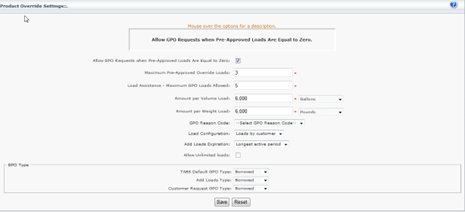
Set the following for Pre-Approved Product Overrides and Global Product Overrides:
- Allow GPO Requests when Pre-Approved Loads are Equal to Zero
- Enables using the Allocation Viewer or Load Assistance Dashboard to approve GPOs even if PAPO loads are not approved.
- Maximum Pre-Approved Override Loads
- Sets the maximum number of loads that can be assigned via the PAPO screen.
- Load Assistance – Maximum GPO Loads Allowed
- Displays the number of loads that can be approved via the Load Assistance Dashboard.
- Amount per Volume Load
- Specifies the Volume based load to be used for the volume available calculations on both GPO and PAPO load approvals.
- Amount per Weight Load
- Enables the user to set the Weight based load to be used for the weight available calculations on both GPO and PAPO load approvals.
- Note: If a GPO is already in existence for the given combination and the addition of a single load via the Load Assistance Dashboard, this would cause the approved volume to be greater than the Load Assistance – Maximum GPO Loads Allowed x Gallons per load. The Load Assistance Dashboard doesn’t allow for the addition of volume. To add volume to a GPO in this situation, the user will need to go to the GPO Setup page. See the Global Product Override (GPO) – Borrowed & Incremental section in this manual for more information on GPO Setup page.
- GPO Reason Code
- Sets the default GPO reason code.
- Load Configuration
- Identifies the load configuration. Options are:
- Loads by customer – all applicable loads are added to the GPO for that allocation. Allows all approved customers the entire approved load amount.
- Max shared loads – only one load is applied at a time and shares the approved load amount across all customers.
- Identifies the load configuration. Options are:
- Add Loads Expiration
- Defines the expiration for add loads. Options are:
- End of the current day – expires at the end of the current day. The GPO expires at midnight in the allocation time zone.
- Longest active period – expires by DTN TABS as it currently does.
- Defines the expiration for add loads. Options are:
- Allow Unlimited Loads
- Allows unlimited preapproved loads but only one GPO per click of the request button. If Max Shared Loads is selected for add loads type then the Unlimited Loads check box can be selected.
- TABS Default GPO Type
- Selects the default GPO Type for the TABS Default GPO, Add Loads Type and Customer Request GPO Type.
- TABS Default GPO Type
- Identifies the initial GPO type for DTN TABS forms where GPOs can be created. Options are:
- Borrowed
- Incremental
- Identifies the initial GPO type for DTN TABS forms where GPOs can be created. Options are:
- Add Loads Type
- Displays the GPO type of a created GPO when PAPO Add Loads feature is used. Options are:
- Borrowed
- Incremental
- Displays the GPO type of a created GPO when PAPO Add Loads feature is used. Options are:
- Customer Request GPO Type
- Sets the initial GPO type for GPO requests submitted by buyers and customers from portal applications like the allocation viewer. Options are:
- Borrowed
- Incremental
- Sets the initial GPO type for GPO requests submitted by buyers and customers from portal applications like the allocation viewer. Options are:
- TABS Default GPO Type
- Selects the default GPO Type for the TABS Default GPO, Add Loads Type and Customer Request GPO Type.
Global Product Override (GPO) – Borrowed & Incremental
A Global Product Override (GPO) is a quick way to add product to a product allocation that has been exhausted or nearly exhausted. This helps you keep traffic moving at the rack if you have the product available. For example, when a product allocation is running low and the customer needs to load more product than will be available before the next Refresh Date, you can issue a GPO to provide additional product right now.
When a driver attempts to lift product from the terminal, the Terminal Automation System (TAS) issues an authorization transaction. DTN TABS checks to see if there are any product allocations for the product, terminal, and consignee combination. It then checks to see if there is a remaining amount on the product allocation. If the product allocation period has been exhausted, that is, if the remaining amount on the product allocation equals zero, DTN TABS will check to see if there are any GPOs. If so, the driver may be authorized to load. When loading is complete, the Lifted Amount on the GPO will be incremented by the quantity loaded.
Note: A GPO cannot be used to override a credit allocation. If a customer’s credit is exhausted, a GPO doesn’t allow the customer to load.
GPOs can only be done at an existing Product Allocation Point and not at generic levels or indirect levels.
There are two types of GPO’s that can be utilized:
Borrowed Global Product Override (GPO)
Incremental Global Product Override (GPO)
Borrowed Global Product Override (GPO)
Borrowed GPOs operate by “borrowing” volume from a longer period allocation (for both flat and hierarchical allocations) to be lifted during the shorter GPO period. For example, if a customer has daily, weekly, and monthly allocations in place, and a GPO is approved in the first week of the month, the customer is able to load additional fuel above their daily limit. The extra lifts for that day apply against both the GPO and also against the active higher periods (monthly and weekly).
Incremental Global Product Override (GPO)
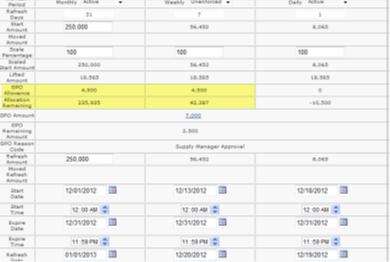
An Incremental GPO maintains the appropriate amount of product at all active periods of a product allocation. The GPO Allowance Amount is the amount that exceeds the allowed allocation and that incremented lifted amount of the GPO. Incremental Amount is added to the longer active periods when the GPO is used and is set to 0 (zero) by the Product Allocation Refresh process.
EXAMPLE
Customer’s current daily allocation is at -6000 gallons, causing them to request a GPO for 7000 gallons to get them through the day.
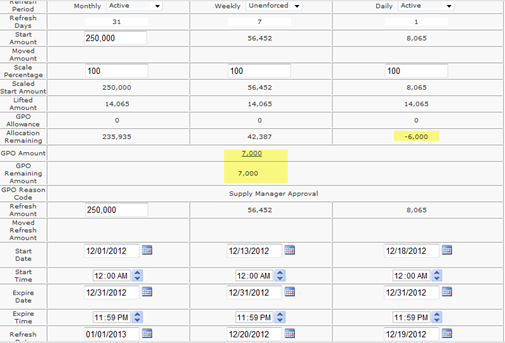
Once the customer starts to lift using the GPO volume, (in this case 4500 gallons) the GPO allowance field displays on the Weekly and Monthly periods. The 4500 gallons and the Allocation remaining still match what it did pre-BOL for the two periods:
GPO Setup in Product Allocation Record
Here’s how to setup a GPO:
- From the Allocations menu, select Manage under the Product
- Using the search criteria, locate the product allocation that has the authorization point attached.
- Click .
- Click to expand the Product Allocation Details panel.
- Click
 . The New Global Product Override page opens.
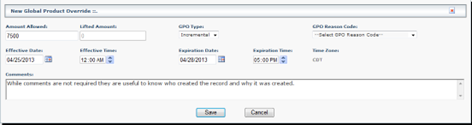
Enter the following:
- Amount Allowed
- Contains the volume for the GPO.
- Lifted Amount
- Displays the volume that has been lifted against this GPO.
- GPO Type
- Specifies the type of GPO. Option are:
- Borrowed
- Incremental
- Specifies the type of GPO. Option are:
- GPO Reason Code
- Provides the GPO reason code.
- Expiration Date
- Identifies the date this GPO is set to become unavailable.
- Expiration Time
- Indicates the time this GPO is set to become unavailable.
- Time Zone
- Defines the time zone and Daylight Savings Time (DST) setting for the allocation record that the GPO is being placed against.
- Comments
- Provides information as to who created the record and why it was created. This is not a required field.
6. Click ![]() to create the GPO.
to create the GPO.
Note: To edit a GPO, follow the same steps above and the edit window opens. You can modify or delete the record at that time.