Setting up System-wide Defaults
The DTN TABS system must be set up so that it matches your method of doing business. The options selected on this page are applied by DTN TABS on a global, system-wide basis. The options may be different depending on the TABS modules being used.
Here’s how to setup System Defaults:
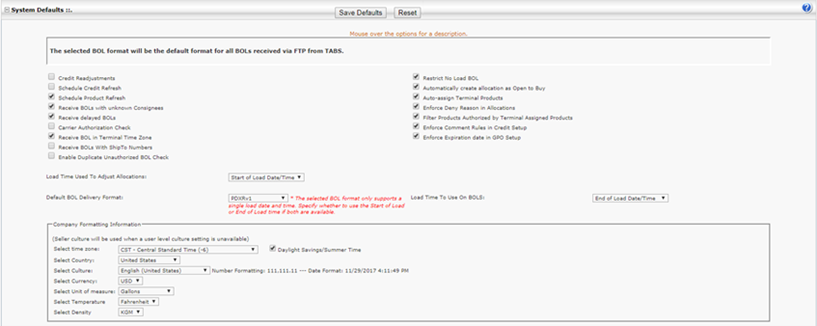
- From the Admin menu, select TABS Defaults. The System Defaults page opens. Select from the following check boxes. Move the pointer over each option for an explanation of that option.
- Select the desired defaults by selecting the box next to the default.
- Click
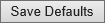 .
.
Changing Company Policy
Administrators can use the Company Policy page to configure DTN TABS to meet your company’s business practices and security requirements when setting security parameters for system access, including login attempts, session time outs, and password rules.
Note: Changes to this page impact all logins and passwords associated with your account. To prevent issues with automated processes (BOL retrieval and ADMLOD file processing), make sure to modify those users to have non-expiring passwords using the User Manager page. For more information on the User Manager page, refer to the Using User Manager section of this manual.
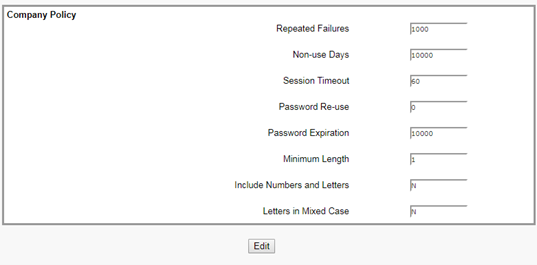
- From the Admin menu, select Company Policies.
- Click
 to edit the Company Policies and the information in the desired fields.
 - Click
 .
.
Entering Company Details
The Company Details page adds information about your company and your internal contacts for DTN TABS.
- From the Admin menu, select Company Details.
- To edit, change any of the following information on the page.
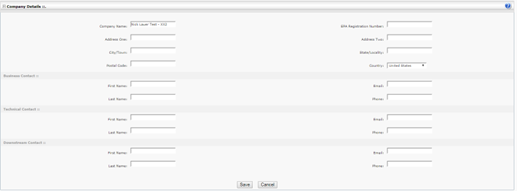
9. Click ![]() .
.
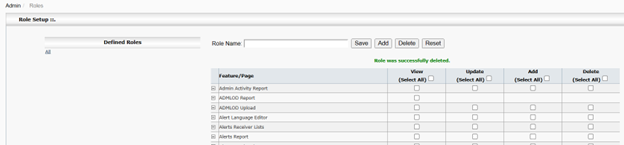
Using Role Setup
Administrators use Role Setup to define User Roles to align with your tasks and responsibilities. A user is assigned pages they can access and the level of access to each page. Levels of access include: view only, update, add, delete or all of these. User roles can be predefined, or custom user roles can be created. A role can be assigned to a user through the User Manager page.
- From the Admin menu, select Roles.
Defined User Roles
These user roles were designed to correspond with the functions and privileges required by typical classes of users.
Note: Administrators can change these roles as needed, in which case the following definitions may no longer apply.
The default roles described below are not available on newer accounts, but the definitions provided below can provide some guidance in crafting your own design.
The default pre-defined authorization level or user role is:
Definition
- All
- User have access to all DTN TABS pages and functions. They can perform any task, including adding, modifying, and deleting records to the database.
Add a User Role
Here’s how to create a new role. These roles can be assigned to a user through User Manager.
- Enter the role name in the Role Name
- Select the transaction types (view, update, add, and delete) for the desired features or pages.
- Note: To select all features/pages for a role, click Select All for the corresponding transaction type.
- Click
 .
.
Change a Role
Here’s how to change an existing role:
- Enter an existing role name in the Role Name field or select a role from the Defined Roles
- Change the privileges as needed.
- Click .
Delete a User Role
Here’s how to delete a user role:
Note: A role cannot be deleted if it is assigned to any users. The user must first be reassigned to another role.
- Enter an existing role name in the Role Name field or select a role from the Defined Roles
- Click
 .
.
Edit a User Role
Here’s how to edit a user role:
- To edit select the View, Update, Add, or Delete column on the defined role.
- Click .
Using TABS Users
Administrators can use the TABS Users page to manage login information for each user. In addition to setting up user login names and passwords, you can use this page to select each user’s authority for accessing various pages and performing tasks.

Add a User
- From the Admin menu, select TABS Users.
- Click
 . The User Details panel opens.
 - Enter the required information. Required fields are:
- First Name
- Last Name
- Alias
- Login
- Password
- User Role
- Enter the user’s email address and phone number, if desired. Entering the user’s email will allow them to receive login name or password recovery emails. These fields are not required, however.
- Select the user’s time zone and flag Daylight Savings/Summer Time, if observed.
- Select a culture for the user.
- Responsibilities are display only.
- Select a User Role.
- Click .
Edit a User
- From the Admin menu, select TABS Users.
- Search for a username to edit.
- To edit, change the necessary information.
- Click .
Delete User
- From the Admin menu, select TABS Users.
- Search for a username to delete.
- Click on the user to display the user details. The message Are you sure you want to delete user? displays.
- Select
 to delete the user.
Change a User’s Password
- From the TABS Users page, find the user whose password you want to change.
- Select Manage Password.
- Enter and confirm the new password.
- Note: Password rules are defined through the Company Policies page.
- Click .
Configurations
Configurations are specific settings for modules within DTN TABS. These will display depending upon the modules you are using.
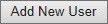
GPO
- From the Admin menu, select GPO.
- Fill in the required fields.
Definitions
- Allow GPO Requests when Pre-Approved Loads are Equal to Zero
- Allows a GPO to be requested if pre-approved loads are equal to zero.
- Maximum Pre-Approved Override Loads
- Defines how many per-approved override loads may be requested.
- Load Assistance – Maximum GPO Loads Allowed
- Defines how many GPOs may be requested from the Load Assistance Dashboard.
- Amount per Volume Load
- Defines the volume allowed based on unit of measure.
- Amount per Weight Load
- Defines the weight allowed based on unit of measure.
- GPO Reason Code
- Identifies the reason code for a GPO.
- Load Configuration
- Loads by customer will give all approved customer the entire approved load amount. Max shared loads will share the approved load amount across all customers.
- Add Loads and GPO Expiration
- Added loads and GPOs can be set to expire at the end of the current day or at the end of the longest active period in the product allocation.
- Expire exhausted GPO
- Expire GPO immediately when all allowed amount is used and remaining amount becomes zero or less.
- Allow Unlimited loads
- Allow unlimited loads can only be checked if max shared loads has been configured. If allow unlimited has been set the pre-approved overrides page will allow customers to be given unlimited loads, whereby they will be able to add one load at a time unrestricted
- Restrict Visibility GPO
- Select this option to restrict GPO requests from being available in Visibility.
- Allow Auto Loads on Deny
- Allows previously set pre-approved loads to be used automatically if an authorization fails due to insufficient allocation volume.
- TABS Default GPO Type
- Sets the initial GPO type for TABS.
- If set to borrowed, the GPO will borrow volume from a longer period allocation to be lifted during the shorter GPO period. For example, if a customer has daily, weekly, and monthly allocations in place, and a GPO is approved in the first week of the month, the customer is able to load additional fuel above their daily limit. However, the extra liftings for that day apply against both the GPO and also against the monthly allocation (and weekly). So, at the end of the month, the customer hits their monthly allocation limit earlier than expected. The supplier then has to create an additional GPO for the customer to lift their normal volumes at the end of the month (or week) or the supplier has to inflate the monthly allocation start amount or scale percentage.
- If set to incremental, the Incremental Allowance Amount is the amount that exceeds allowed allocation and that incremented lifted amount of GPO. Incremental Amount will be added to the longer periods when GPO is used and will be set to zero by Product Allocation Refresh process.
- Sets the initial GPO type for TABS.
- Add Loads Type
- Add Loads Type determines the GPO type created when using PAPO Add Loads. Options are the same as for TABS Default GPO Type.
- Customer Request GPO Type
- This setting determines the initial GPO type for GPO requests submitted by customers from portal applications such as Allocation Viewer or Visibility. Options are the same as for TABS Default GPO Type.
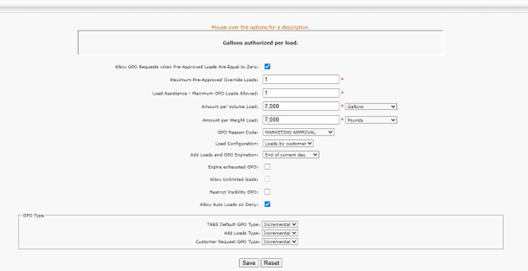
Custom Display Options
The Custom Display page overrides Enhanced Credit Labels on the Credit Manage page and the Enhanced Credit Allocation Reports. Company-specific terms can be assigned to credit terms to match your business model. If a field is set to Inactive, the field is removed from the credit setup page and Reports.
- From the Admin menu, select Custom Display Options.
- Fill in the required fields.
Visibility
The Visibility page allows for customization of features within Visibility.
- From the Admin menu, select Visibility.
- Select each feature to customize
- Product Setup
- Allows for customization of product displays within Visibility.
- Ratability Setup
- Defines Ratability displays for Visibility.
- Credit Setup
- Defines how credit will display in Visibility.
- Product Name Mapping
- Allows for customization of product names within Visibility.
- Terminal Name Mapping
- Customizes terminal names in Visibility.
AV
The AV page allows for customization of features within AV.
- From the Admin menu, select AV.
- Select each feature to customize
- Display Consignees on Allocation Header
- Allows consignees to be displayed in the allocation header.
- Enable the Display of Consignee Level Allocations
- Allows consignee level allocations to display in AV.
- Enable Credit Visibility
- Allows credit allocations to display in AV.
- Automatically Expire GPO Requests
- Determines when a GPO request will expire if not approved.
- Allocation Viewer Alert Management
- Determines the alerts to be managed within AV.
- Role/Channel Management
- Determines which channels a user or admin can manage.
- Unenforced Production Allocation
- Shows unenforced allocations for admin and users.
- Supply Events – Backup Terminal Restriction
- Configures customers assigned to channels to view backup terminal information for supply events. The backup terminal indicates an alternative terminal for loading in a supply event situation. This options allows the ability to control who views the backup terminals.
Pre-Order
The Pre- Order page allows for customization of features within AV.
- From the Admin menu, select AV.
- Select each feature to customize
- Pre-Order Dates
- Defines days of the week, entry cut-off, days in advance, expiration days and hold cancellation days for pre-orders.
- Amount Validation
- Defines the unit type and unit of measure for countries, terminals and channels.
- Messages
- Defines the messages associated with product and credit for pre-orders.
- Destination Type
- Defines excise codes for a pre-order.
- Destination
- Allows for searching, filtering, editing and deleting pre-order destinations.
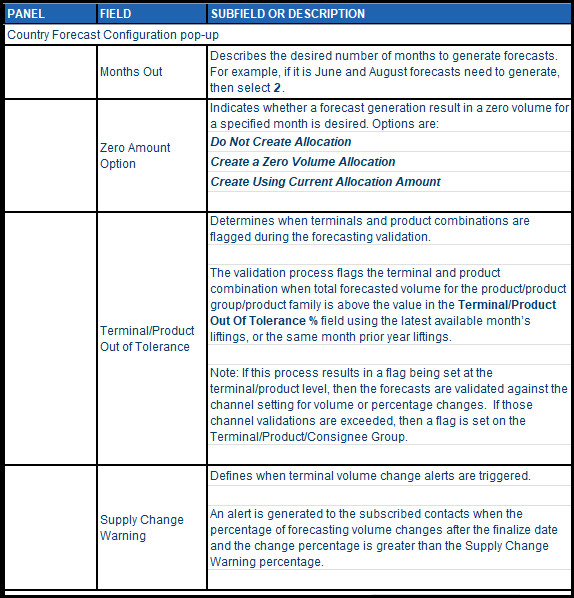
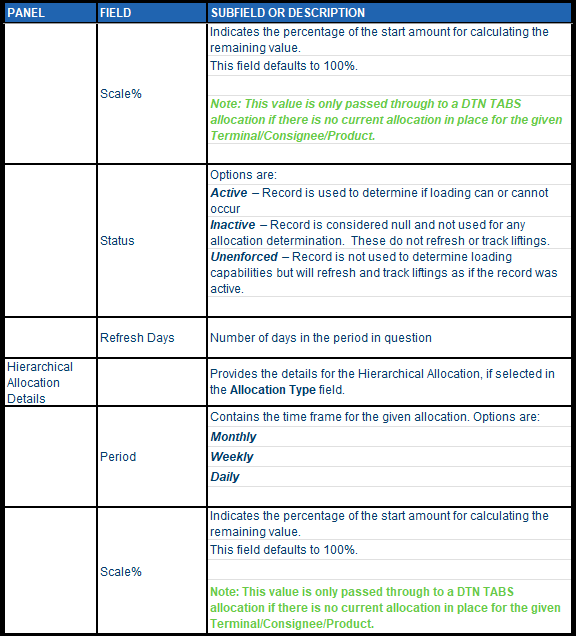
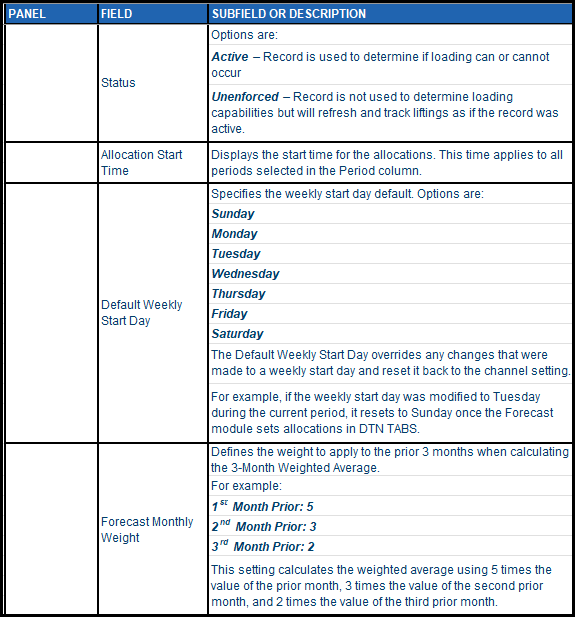
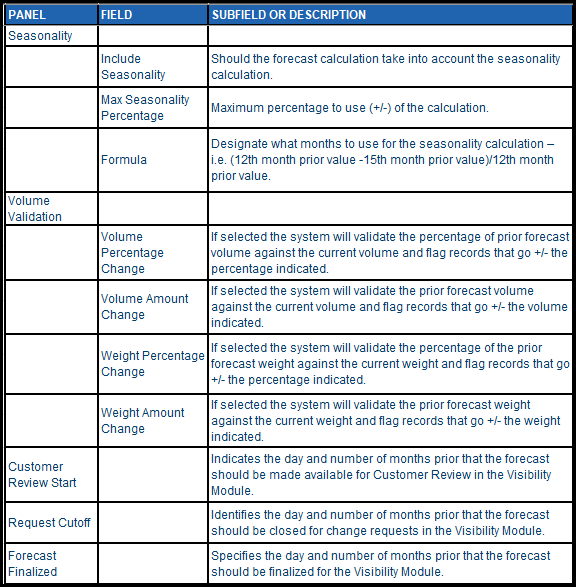
Forecast
The Forecast page defines processing for Forecast. Note: Not all screens will be available depending on the functionality being used.
- From the Admin menu, select Forecast.
- Customize Forecasts per country.

Master Data
The Master Data page defines processing for Master Data.
- From the Admin menu, select Master Data.
- Customize Forecasts per country.
- Do not process ShipTo lockouts for the following channels
- Indicates that ShipTo lockouts are not processed for ShipTos which are in channels defined and maintained by the seller. Add mutiple channels by clicking the Add link.
- Channel Consignee Group to use for Spot Contracts
- Specifies the Channel Consignee Group representing Spot Contracts. Spot Contract settings are applicable to German Spot Contracts.
- Shipto’s in these channels with X days or less will also be added to the Spot Contract Channel
- Consignee Group
- Contract Channel Consignee
- Contains the number of days that serve as a threshold to assign ShipTos to the Spot Group. Valid Values are: 1 to 99. Channels are selected to identify which consignees are auto assigned to the Spot Contract Channel Consignee Group.
- Add multiple ShipTos by clicking the Add link.
- Enter the consignee setup to represent Shipments during lifting authorization
- Identifies the consignee that represents shipments during lifting authorizations
- Terminals that will send the Shipment Number for lifting authorizations
- Maps the shipment number to the configured shipment consignee if the terminal is in the list when MasterData processes <SHIPMENT> messages.
- Credit Allocations / Credit Status are:
- Determines the status of a credit allocations
- Enforced
- Open
- Unenforced
- Deny
- Determines the status of a credit allocations
- Full Truck
- Determines if Full Truck functionality should be applied. Options are to enforce and use standard truck size.
- Decrement Volume Amount
- Defines the decrement volume amount.
- Default UOM
- Determines the default unit of measure
- Decrement Weight Amount
- Defines the decrement weight amount.
- Default UOM
- Determines the default unit of measure
BOL Errors
The BOL Errors page defines processing for BOL Errors.
- From the Admin menu, select BOL Errors.
- Customize functionality per error type.
- Error Type
- Defines supported error types. Each option identifies the handling stage and description of the error type.
- Available options are:
- Carrier Mapping
- Company Mapping
- Contract Compartments
- Contract Number Compartment Quantity Enhancement Error
- Contract Product
- Duplicate BOL
- Failed Conversion
- Failed Enhancement
- Invalid Load ID
- Product Amount
- Product Mapping
- Shipment Compartments
- Shipment Number
- Terminal Mapping
- BOL Error Root Cause Setup
- Allows users to view, create and update possible cause for each BOL Error type.
Supply Events
The Supply Events page defines processing for Supply Events.
- From the Admin menu, select Supply Events.
- Customize features.
- Status
- Assigning a rank to each code determines the most prominent color to be displayed in the case where more than one active event occurs for a terminal and/or product.
- Resolution
- Resolution codes can also be configured within DTN TABS. These allow quick and easy classification of event resolutions. Once assigned to events, the resolution codes can be used to filter current or past events for easy identification and reporting. Resolution information can be used to analyze events.
- Event Type
- Identifies the type of Supply Events being utilized, the message to be displayed in Visibility and the default notification message. These are customizable based on internal needs.
- Schedule
- Determines when notifications should be sent. Options are:
- New Event
- Days in Advance
- Event Start Date Time
- Event End Date Time
- Determines when notifications should be sent. Options are:
- Planned Movement
- Identifies expiration date and authorization parameters for Planned Movements. Options for Expiration Date Calculations are:
- Orders
- Contracts
- Shipments
- Identifies expiration date and authorization parameters for Planned Movements. Options for Expiration Date Calculations are:
- Options for Authorization Settings are:
- Terminal
- Orders
- Contracts
- Shipments
- Enable All
- will select Request PM Documentation and Limit Products on Authorization Response for Orders, Contracts, and Shipments.
- Request PM Documentation
- indicates planned movements must match data setup within TABS.
- Limit Products on Authorization Response
- indicates products authorized are filtered based on products allocated.
Running Reports
Running the User Details Report
The User Details Report provides a list of all the users in your database. The report includes the user’s name and login, as well as the user’s authorization level and code.
- From the Reports menu, select Reports.
- From the Setup Reports panel, select User Details Report.

Here’s how to run the report:
- Select the information to appear on the report through the following criteria:
- Name
- Specifies the user’s last and first name separated by a comma.
- User Login
- Contains the username for logging onto the system.
- Authorization Level
- Defines roles and access privileges.
2. Click ![]() .
.
3. To export the report to excel, click ![]() .
.
Running the Admin Activity Report
The Admin Activity Report is a summary of administrative activities that have been performed within your system during a specified period. You can use it to track who is performing an activity within your DTN TABS system. Tracking includes records being added, updated or deleted; ADMLODs performed; BOLS received; and reports generated.
- From the Reports menu, select Reports.
- From the BOL Reports panel, select Admin Activity Report.

Here’s how to run the report:
- Select the information to appear on the report through the following criteria:
- Start Date/Time and End Date/Time
- Displays the date range to use for searching
- File Name
- Identifies the type record generated by a user action.
- User Name
- Contains the user who performed the action.
- Transaction Type
- Specifies the type of action that was performed.
- Action Results
- Provides the result of the action.
2. Click ![]() .
.
3. To export the report to excel, click ![]() .
.
Running Security Audit Reports
Logs additions and edits to user accounts and company policy records, providing a history of changes.
- From the Reports menu, select Reports.
- From the Other Reports panel, select Security Audit Report.

Running the Company Policy Report
Here’s how to run the report:
1. Select the information to appear on the report through the following criteria:
- Audit Type
- Select Company Policy
- Start Date/Time
- Defines the start date and time for the report range.
- End Date/Time
- Provides the end date and time for the report range.
2. Click ![]() . The report appears.
. The report appears.
Note: This report cannot be exported.
Running the User Accounts Audit Report
Here’s how to run the report:
1. Select the information to appear on the report through the following criteria:
- Login Name
- Enter a login name to search on. To see all logins, leave this field blank
- Start Date/Time
- Defines the start date and time for the report range.
- End Date/Time
- Provides the end date and time for the report range.
2. Click Search. The report appears.
Information on this report also includes the following:
- Login Name
- Displays login name.
- Failed Login Attempts
- Shows the number of failed login attempts.
- Account Disabled
- Identifies if the login has been disabled.
- Account Locked
- Identifies if the login has been locked.
- Date Activated
- Displays the date and time the login was created.
- Date of Last Login
- Displays the date and time of the last login.
- Time Zone
- Indicates the time zone assigned to the login.
- Observes Daylight Savings
- Indicates if Daylight Savings is applied to the login.
- Modified/Created
- Identifies if the login was created or modified at the time displayed. Modified will display if a password was changed or anytime a login is used.
- Modified Date/Time
- Identifies the date/time the login was modified.
- Modified By
- Identifies the TABS login that made the modification.