About DTN Storefront – Buyers
DTN’s Storefront allows buyers to access a single site to obtain a cohesive view of alerts, allocations, contracts, forecasts, loading data, pre-orders and terminals with a supplier. When access is granted, users can make informed and strategic decisions regarding their day-to-day and long-term activity.
Accessing DTN Storefront
Upon setup by your supplier, you will receive a welcome email to your supplier’s Sales & Marketing Solution site. Once logged in, you will be presented with your dashboard.
Your dashboard provides a condensed view of information from your supplier. Selecting terminals and/or products will filter the data to a narrower view.
The dashboard can be used to view:
- Exhausted Allocations
- GPOs Requested
- Terminal Disruptions
- Credit Status
- Allocations Remaining
- Supply Event Alerts
- Allocation Alert History
These options are also available using the menu on the left panel.

Navigating DTN Storefront
Menu options on the left panel allow you to navigate through the site.
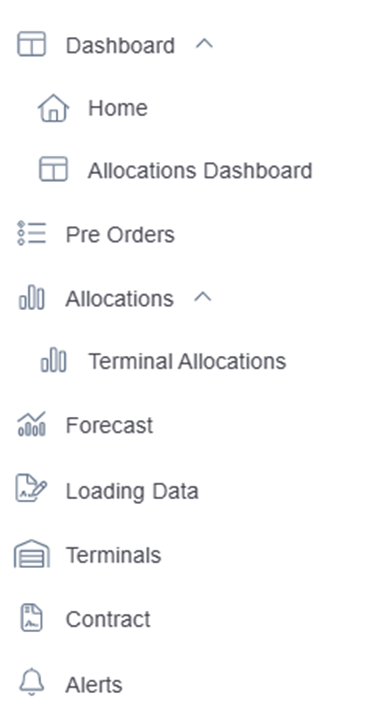
- Dashboard
- Home
- Allows you to navigate to the main display.
- Allocations Dashboard
- Allows you to navigate to view allocations.
- Home
- Pre-Orders
- Allows you to create, upload, download, cancel and edit pre-order information.
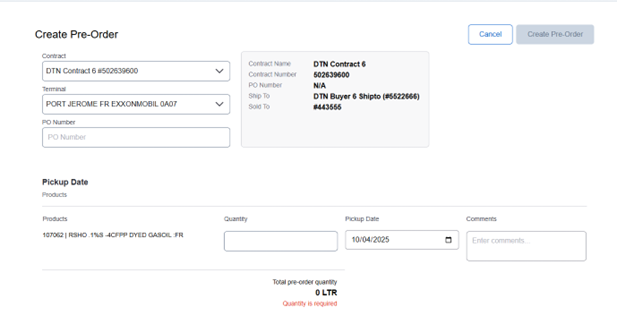
- Create Pre-Order
- Select a contract and terminal.
- A form will be displayed.
- Enter the quantity and pickup date for the pre-order.
- Select Create Pre-Order.
- Allows you to create, upload, download, cancel and edit pre-order information.
- To view a pre-order, use Search to filter specific criteria. Otherwise, select the pre-order to view by clicking the down arrow to the left of the terminal name.
- Pre-Order information may be printed or downloaded from this page.
- Note: The Pickup Date must be a date within the contract dates or the pre-order cannot be created.
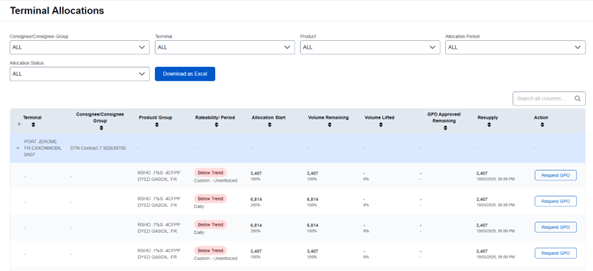
- Allocations
- Terminal Allocations
- This page allows you to view allocation information.
- Use dropdown menus to filter specific criteria.
- Results may be downloaded as an Excel file.
- GPOs (Global Product Overrides) may be requested to add additional volume.
- Terminal Allocations
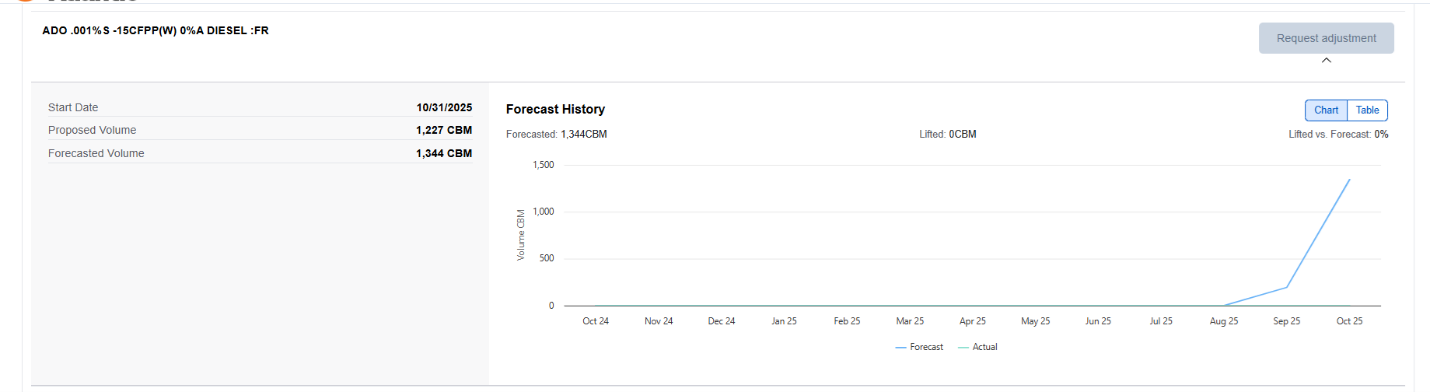
- Forecast
- This page displays forecast information. Information provided includes:
- Soldto
- Product Name
- Start Date
- Proposed Volume
- Forecasted Volume
- Forecast History
- Adjustments to forecasts may be requested from this page.
- This page displays forecast information. Information provided includes:
- Loading Data
- This page displays loading data information. Information provided includes:
- BOL Number
- Terminal
- Product
- Customer
- Contract Number
- Sold To
- Ship Date
- Quantity
- Filters can be applied to view specific information.
- Data may be printed as PDF or downloaded in Excel format.
- This page displays loading data information. Information provided includes:

- Terminals
- This page displays a list of terminals. Information provided includes:
- Terminal Name
- Address
- Operating Hours
- Products Available
- This page displays a list of terminals. Information provided includes:

- Contract
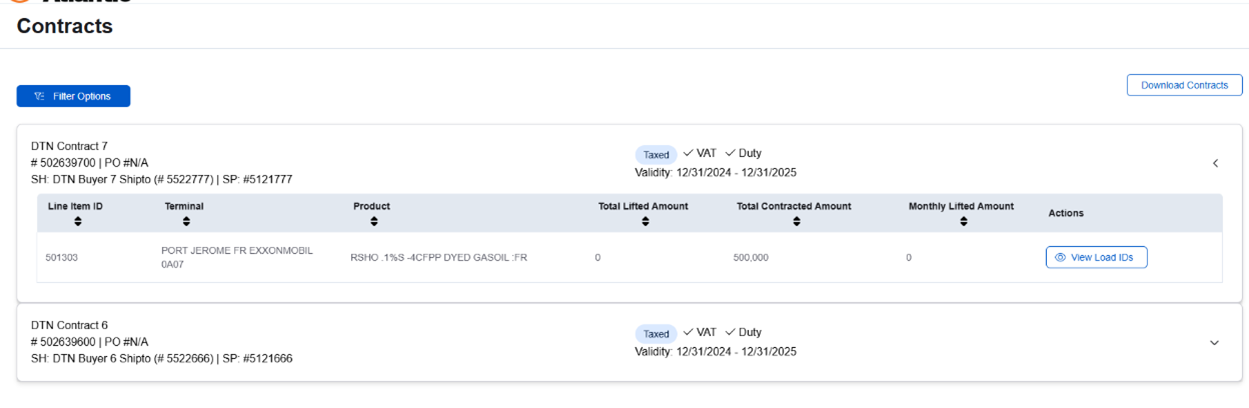
- This page provides information regarding contracts.
- Details include contract ID, PO number, shipto, taxes and time span.
- Expanded information includes line-item IDs, terminals, products, total lifted amount, total contracted amount, monthly lifted amount and action. Load IDs may be viewed from this section as well.
- Contracts may be downloaded to an Excel file.
- Alerts
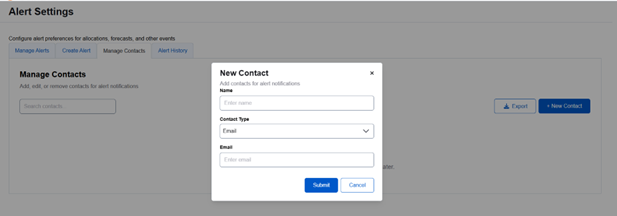
- The Alerts page allows you to configure alerts you would like to receive, create an alert, manage contacts and view alert history.
- For ease of configuration, begin with Manage Contacts.
- Select New Contact. A form will display.
- Enter contact name, contact type (email or phone) and email address.
- Submit.
- Contacts may be exported to an Excel file from this page.
- For ease of configuration, begin with Manage Contacts.
- The Alerts page allows you to configure alerts you would like to receive, create an alert, manage contacts and view alert history.
-
- Select Manage Alerts to configure the alert(s) you wish to receive. You will be directed to the Create Alert page.
- Select the alert type and fill in the form.
- Select the terminal/product combination to receive the alert for.
- Select the parameters under which an alert should be generated.
- Click Add Contact to define users who should receive the alerts.
- Save.

- Alert History allows you to search for generated alerts over a time span.
- Select the type of alert to search for.
- Enter from and to dates.
- Results will be displayed.

- User Settings
- The Alerts page allows you to configure alerts you would like to receive, create an alert, manage contact and view alert history.
- For ease of configuration, begin with Manage Contacts.
- Select New Contact. A form will display.
- Enter contact name, contact type (email or phone) and email address.
- Submit.
- Contacts may be exported to an Excel file from this page.
- For ease of configuration, begin with Manage Contacts.
- The Alerts page allows you to configure alerts you would like to receive, create an alert, manage contact and view alert history.